This guide will walk you through the steps to add and play audio files in your Android app using Java in Android Studio.
Prerequisites
- A basic Java Android project created
- An audio file in
.mp3,.ogg, or.wavformat (place it in theres/rawfolder)
Step 1: Add the Audio File
- Create a folder named
rawinside theresdirectory (if it doesn’t exist): - Place your audio file inside the raw folder. For example:
- Create a folder named
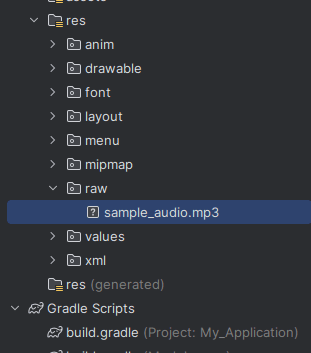
res/raw/sample_audio.mp3
Step 2: Create the UI
Open res/layout/activity_main.xml and add buttons:

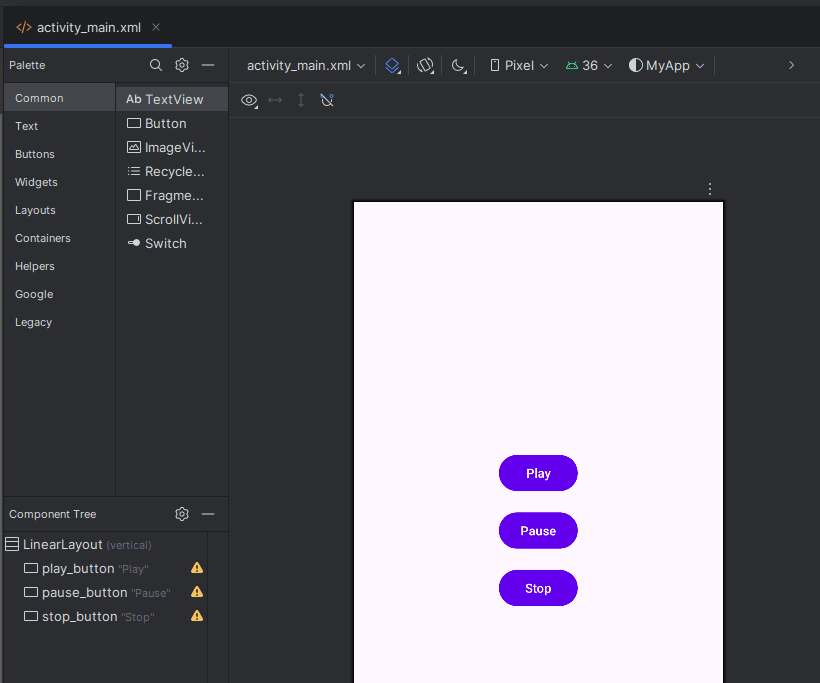
<LinearLayout xmlns:android="http://schemas.android.com/apk/res/android"
    android:orientation="vertical"
    android:gravity="center"
    android:layout_width="match_parent"
    android:layout_height="match_parent"
    android:padding="24dp">

    <Button
        android:id="@+id/play_button"
        android:layout_width="wrap_content"
        android:layout_height="wrap_content"
        android:text="Play" />

    <Button
        android:id="@+id/pause_button"
        android:layout_width="wrap_content"
        android:layout_height="wrap_content"
        android:text="Pause"
        android:layout_marginTop="16dp" />

    <Button
        android:id="@+id/stop_button"
        android:layout_width="wrap_content"
        android:layout_height="wrap_content"
        android:text="Stop"
        android:layout_marginTop="16dp" />
</LinearLayout>
Step 3: Use MediaPlayer in Java
Add this code to your Activity (e.g., MainActivity.java):

import android.media.MediaPlayer;
import android.os.Bundle;
import android.view.View;
import android.widget.Button;
import androidx.appcompat.app.AppCompatActivity;

public class MainActivity extends AppCompatActivity {

    MediaPlayer mediaPlayer;
    Button playButton, pauseButton, stopButton;

    @Override
    protected void onCreate(Bundle savedInstanceState) {
        super.onCreate(savedInstanceState);
        setContentView(R.layout.activity_main);

        playButton = findViewById(R.id.play_button);
        pauseButton = findViewById(R.id.pause_button);
        stopButton = findViewById(R.id.stop_button);

        // Initialize MediaPlayer
        mediaPlayer = MediaPlayer.create(this, R.raw.sample_audio);

        // Play
        playButton.setOnClickListener(new View.OnClickListener() {
            @Override
            public void onClick(View v) {
                if (!mediaPlayer.isPlaying()) {
                    mediaPlayer.start();
                }
            }
        });

        // Pause
        pauseButton.setOnClickListener(new View.OnClickListener() {
            @Override
            public void onClick(View v) {
                if (mediaPlayer.isPlaying()) {
                    mediaPlayer.pause();
                }
            }
        });

        // Stop
        stopButton.setOnClickListener(new View.OnClickListener() {
            @Override
            public void onClick(View v) {
                if (mediaPlayer != null) {
                    mediaPlayer.stop();
                    mediaPlayer.release();
                    mediaPlayer = MediaPlayer.create(MainActivity.this, R.raw.sample_audio);
                }
            }
        });
    }

    @Override
    protected void onDestroy() {
        if (mediaPlayer != null) {
            mediaPlayer.release();
            mediaPlayer = null;
        }
        super.onDestroy();
    }
}
Step 4: Test Your App
- Run the app on a real device or emulator.
- Click Play, Pause, or Stop to control the audio playback.
Notes
- Always release
MediaPlayerwhen not needed to avoid memory leaks. - Use audio formats supported by Android (MP3, WAV, OGG).
- You can handle more complex audio features using
ExoPlayer.
- Always release