In modern Android development, the Toolbar is a flexible and customizable replacement for the traditional ActionBar. This guide will show you how to implement and customize the Toolbar and ActionBar in your Android app using Java and Android Studio.
1. Add Toolbar to Layout
Open your activity_main.xml or any layout XML and add the Toolbar widget:

<androidx.appcompat.widget.Toolbar
    android:id="@+id/my_toolbar"
    android:layout_width="match_parent"
    android:layout_height="?attr/actionBarSize"
    android:background="?attr/colorPrimary"
    android:elevation="4dp"
    android:theme="@style/ThemeOverlay.AppCompat.Dark.ActionBar"
    app:titleTextColor="@android:color/white"
    app:popupTheme="@style/ThemeOverlay.AppCompat.Light" />
Make sure you place this inside a CoordinatorLayout, AppBarLayout, or LinearLayout depending on your design.
2. Use Toolbar in Activity
In your MainActivity.java:


import androidx.appcompat.widget.Toolbar;

public class MainActivity extends AppCompatActivity {
    @Override
    protected void onCreate(Bundle savedInstanceState) {
        super.onCreate(savedInstanceState);
        setContentView(R.layout.activity_main);

        Toolbar toolbar = findViewById(R.id.my_toolbar);
        setSupportActionBar(toolbar);

        // Optional: Set title
        getSupportActionBar().setTitle("My Custom Toolbar");

        // Optional: Enable back button
        getSupportActionBar().setDisplayHomeAsUpEnabled(true);
    }

    // Handle back button click
    @Override
    public boolean onOptionsItemSelected(MenuItem item) {
        if (item.getItemId() == android.R.id.home) {
            finish(); // or any custom action
            return true;
        }
        return super.onOptionsItemSelected(item);
    }
}
3. Customize Toolbar Appearance
You can change:
- Prefer Toolbar over ActionBar for flexibility.
- Always test on multiple devices.
- Use
Theme.MaterialComponentsfor modern look. - Avoid hardcoded strings (use
strings.xml).
Conclusion
Now you know how to customize Toolbar and ActionBar in Android Studio using Java. This can drastically improve the user interface of your app and offer better branding and navigation control.
- Title: In Java or XML (
app:title="My Title") - Text Color:
app:titleTextColor - Background Color:
android:background - Elevation/Shadow:
android:elevation - Icons: Add icons via menu resources.
- Title: In Java or XML (
4. Create a Menu for Toolbar
Create a file in res/menu/toolbar_menu.xml:
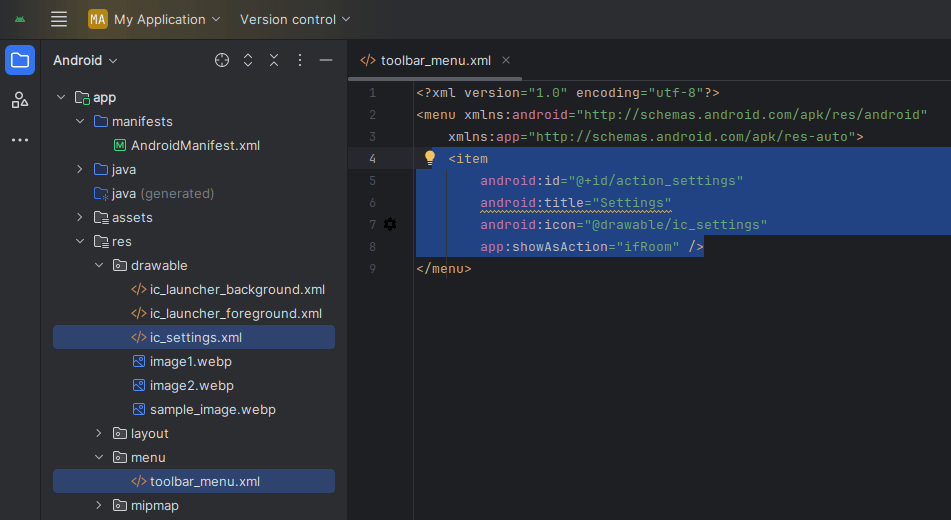
<?xml version="1.0" encoding="utf-8"?>
<menu xmlns:android="http://schemas.android.com/apk/res/android"
    xmlns:app="http://schemas.android.com/apk/res-auto">
    <item
        android:id="@+id/action_settings"
        android:title="Settings"
        android:icon="@drawable/ic_settings"
        app:showAsAction="ifRoom" />
</menu>
Load the menu in your activity:
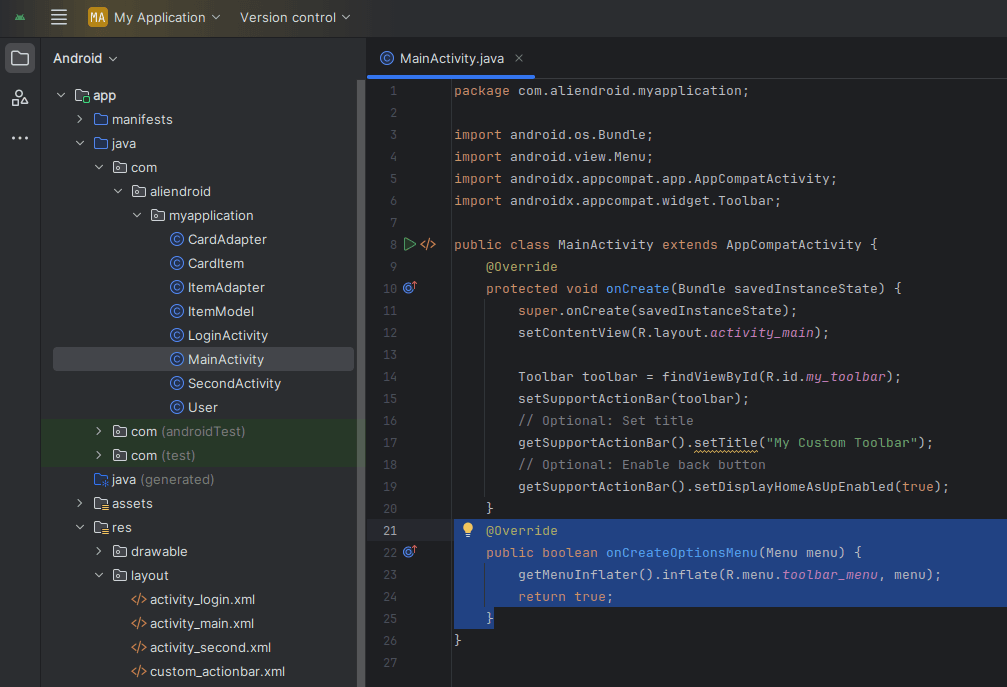

@Override
public boolean onCreateOptionsMenu(Menu menu) {
    getMenuInflater().inflate(R.menu.toolbar_menu, menu);
    return true;
}
5. Custom Layout in ActionBar
Example custom_actionbar.xml:
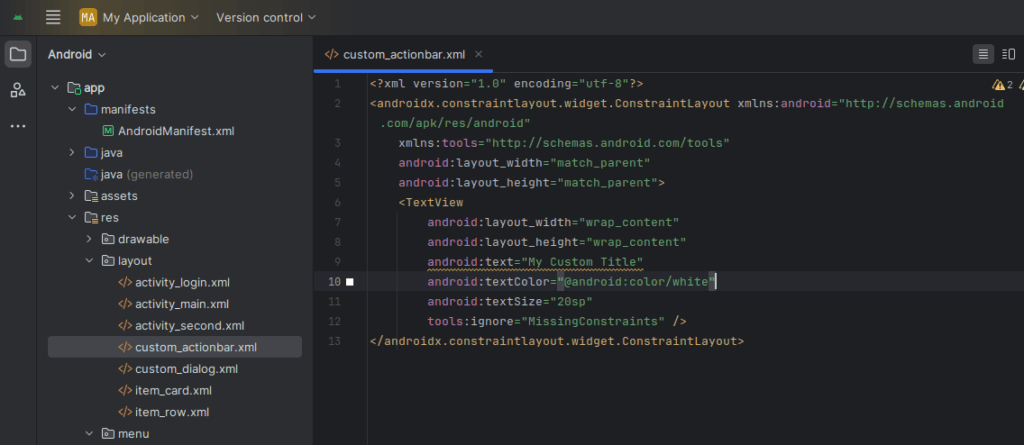
<TextView
    android:layout_width="wrap_content"
    android:layout_height="wrap_content"
    android:text="My Custom Title"
    android:textColor="@android:color/white"
    android:textSize="20sp" />
You can use a custom layout if you still want to use ActionBar directly:


ActionBar actionBar = getSupportActionBar();
if (actionBar != null) {
    actionBar.setDisplayOptions(ActionBar.DISPLAY_SHOW_CUSTOM);
    actionBar.setCustomView(R.layout.custom_actionbar);
}
6. Best Practices
- Prefer Toolbar over ActionBar for flexibility.
- Always test on multiple devices.
- Use
Theme.MaterialComponentsfor modern look. - Avoid hardcoded strings (use
strings.xml).
Conclusion
Now you know how to customize Toolbar and ActionBar in Android Studio using Java. This can drastically improve the user interface of your app and offer better branding and navigation control.
- Title: In Java or XML (
app:title="My Title") - Text Color:
app:titleTextColor - Background Color:
android:background - Elevation/Shadow:
android:elevation - Icons: Add icons via menu resources.
- Title: In Java or XML (
4. Create a Menu for Toolbar
Create a file in res/menu/toolbar_menu.xml:
<?xml version="1.0" encoding="utf-8"?>
<menu xmlns:android="http://schemas.android.com/apk/res/android"
    xmlns:app="http://schemas.android.com/apk/res-auto">
    <item
        android:id="@+id/action_settings"
        android:title="Settings"
        android:icon="@drawable/ic_settings"
        app:showAsAction="ifRoom" />
</menu>
Load the menu in your activity:
@Override
public boolean onCreateOptionsMenu(Menu menu) {
    getMenuInflater().inflate(R.menu.toolbar_menu, menu);
    return true;
}
5. Custom Layout in ActionBar
Example custom_actionbar.xml:
<TextView
    android:layout_width="wrap_content"
    android:layout_height="wrap_content"
    android:text="My Custom Title"
    android:textColor="@android:color/white"
    android:textSize="20sp" />
You can use a custom layout if you still want to use ActionBar directly:
ActionBar actionBar = getSupportActionBar();
if (actionBar != null) {
    actionBar.setDisplayOptions(ActionBar.DISPLAY_SHOW_CUSTOM);
    actionBar.setCustomView(R.layout.custom_actionbar);
}
6. Best Practices
- Prefer Toolbar over ActionBar for flexibility.
- Always test on multiple devices.
- Use
Theme.MaterialComponentsfor modern look. - Avoid hardcoded strings (use
strings.xml).
Conclusion
Now you know how to customize Toolbar and ActionBar in Android Studio using Java. This can drastically improve the user interface of your app and offer better branding and navigation control.
- Title: In Java or XML (
app:title="My Title") - Text Color:
app:titleTextColor - Background Color:
android:background - Elevation/Shadow:
android:elevation - Icons: Add icons via menu resources.
- Title: In Java or XML (
4. Create a Menu for Toolbar
Create a file in res/menu/toolbar_menu.xml:
<?xml version="1.0" encoding="utf-8"?>
<menu xmlns:android="http://schemas.android.com/apk/res/android"
    xmlns:app="http://schemas.android.com/apk/res-auto">
    <item
        android:id="@+id/action_settings"
        android:title="Settings"
        android:icon="@drawable/ic_settings"
        app:showAsAction="ifRoom" />
</menu>
Load the menu in your activity:
@Override
public boolean onCreateOptionsMenu(Menu menu) {
    getMenuInflater().inflate(R.menu.toolbar_menu, menu);
    return true;
}
5. Custom Layout in ActionBar
Example custom_actionbar.xml:
<TextView
    android:layout_width="wrap_content"
    android:layout_height="wrap_content"
    android:text="My Custom Title"
    android:textColor="@android:color/white"
    android:textSize="20sp" />
You can use a custom layout if you still want to use ActionBar directly:
ActionBar actionBar = getSupportActionBar();
if (actionBar != null) {
    actionBar.setDisplayOptions(ActionBar.DISPLAY_SHOW_CUSTOM);
    actionBar.setCustomView(R.layout.custom_actionbar);
}
6. Best Practices
- Prefer Toolbar over ActionBar for flexibility.
- Always test on multiple devices.
- Use
Theme.MaterialComponentsfor modern look. - Avoid hardcoded strings (use
strings.xml).
Conclusion
Now you know how to customize Toolbar and ActionBar in Android Studio using Java. This can drastically improve the user interface of your app and offer better branding and navigation control.
- Title: In Java or XML (
app:title="My Title") - Text Color:
app:titleTextColor - Background Color:
android:background - Elevation/Shadow:
android:elevation - Icons: Add icons via menu resources.
- Title: In Java or XML (
4. Create a Menu for Toolbar
Create a file in res/menu/toolbar_menu.xml:
<?xml version="1.0" encoding="utf-8"?>
<menu xmlns:android="http://schemas.android.com/apk/res/android"
    xmlns:app="http://schemas.android.com/apk/res-auto">
    <item
        android:id="@+id/action_settings"
        android:title="Settings"
        android:icon="@drawable/ic_settings"
        app:showAsAction="ifRoom" />
</menu>
Load the menu in your activity:
@Override
public boolean onCreateOptionsMenu(Menu menu) {
    getMenuInflater().inflate(R.menu.toolbar_menu, menu);
    return true;
}
5. Custom Layout in ActionBar
Example custom_actionbar.xml:
<TextView
    android:layout_width="wrap_content"
    android:layout_height="wrap_content"
    android:text="My Custom Title"
    android:textColor="@android:color/white"
    android:textSize="20sp" />
You can use a custom layout if you still want to use ActionBar directly:
ActionBar actionBar = getSupportActionBar();
if (actionBar != null) {
    actionBar.setDisplayOptions(ActionBar.DISPLAY_SHOW_CUSTOM);
    actionBar.setCustomView(R.layout.custom_actionbar);
}
6. Best Practices
- Prefer Toolbar over ActionBar for flexibility.
- Always test on multiple devices.
- Use
Theme.MaterialComponentsfor modern look. - Avoid hardcoded strings (use
strings.xml).
Conclusion
Now you know how to customize Toolbar and ActionBar in Android Studio using Java. This can drastically improve the user interface of your app and offer better branding and navigation control.
- Title: In Java or XML (
app:title="My Title") - Text Color:
app:titleTextColor - Background Color:
android:background - Elevation/Shadow:
android:elevation - Icons: Add icons via menu resources.
- Title: In Java or XML (
4. Create a Menu for Toolbar
Create a file in res/menu/toolbar_menu.xml:
<?xml version="1.0" encoding="utf-8"?>
<menu xmlns:android="http://schemas.android.com/apk/res/android"
    xmlns:app="http://schemas.android.com/apk/res-auto">
    <item
        android:id="@+id/action_settings"
        android:title="Settings"
        android:icon="@drawable/ic_settings"
        app:showAsAction="ifRoom" />
</menu>
Load the menu in your activity:
@Override
public boolean onCreateOptionsMenu(Menu menu) {
    getMenuInflater().inflate(R.menu.toolbar_menu, menu);
    return true;
}
5. Custom Layout in ActionBar
Example custom_actionbar.xml:
<TextView
    android:layout_width="wrap_content"
    android:layout_height="wrap_content"
    android:text="My Custom Title"
    android:textColor="@android:color/white"
    android:textSize="20sp" />
You can use a custom layout if you still want to use ActionBar directly:
ActionBar actionBar = getSupportActionBar();
if (actionBar != null) {
    actionBar.setDisplayOptions(ActionBar.DISPLAY_SHOW_CUSTOM);
    actionBar.setCustomView(R.layout.custom_actionbar);
}
6. Best Practices
- Prefer Toolbar over ActionBar for flexibility.
- Always test on multiple devices.
- Use
Theme.MaterialComponentsfor modern look. - Avoid hardcoded strings (use
strings.xml).
Conclusion
Now you know how to customize Toolbar and ActionBar in Android Studio using Java. This can drastically improve the user interface of your app and offer better branding and navigation control.
- Title: In Java or XML (
app:title="My Title") - Text Color:
app:titleTextColor - Background Color:
android:background - Elevation/Shadow:
android:elevation - Icons: Add icons via menu resources.
- Title: In Java or XML (
4. Create a Menu for Toolbar
Create a file in res/menu/toolbar_menu.xml:
<?xml version="1.0" encoding="utf-8"?>
<menu xmlns:android="http://schemas.android.com/apk/res/android"
    xmlns:app="http://schemas.android.com/apk/res-auto">
    <item
        android:id="@+id/action_settings"
        android:title="Settings"
        android:icon="@drawable/ic_settings"
        app:showAsAction="ifRoom" />
</menu>
Load the menu in your activity:
@Override
public boolean onCreateOptionsMenu(Menu menu) {
    getMenuInflater().inflate(R.menu.toolbar_menu, menu);
    return true;
}
5. Custom Layout in ActionBar
Example custom_actionbar.xml:
<TextView
    android:layout_width="wrap_content"
    android:layout_height="wrap_content"
    android:text="My Custom Title"
    android:textColor="@android:color/white"
    android:textSize="20sp" />
You can use a custom layout if you still want to use ActionBar directly:
ActionBar actionBar = getSupportActionBar();
if (actionBar != null) {
    actionBar.setDisplayOptions(ActionBar.DISPLAY_SHOW_CUSTOM);
    actionBar.setCustomView(R.layout.custom_actionbar);
}
6. Best Practices
- Prefer Toolbar over ActionBar for flexibility.
- Always test on multiple devices.
- Use
Theme.MaterialComponentsfor modern look. - Avoid hardcoded strings (use
strings.xml).
Conclusion
Now you know how to customize Toolbar and ActionBar in Android Studio using Java. This can drastically improve the user interface of your app and offer better branding and navigation control.
- Title: In Java or XML (
app:title="My Title") - Text Color:
app:titleTextColor - Background Color:
android:background - Elevation/Shadow:
android:elevation - Icons: Add icons via menu resources.
- Title: In Java or XML (
4. Create a Menu for Toolbar
Create a file in res/menu/toolbar_menu.xml:
<?xml version="1.0" encoding="utf-8"?>
<menu xmlns:android="http://schemas.android.com/apk/res/android"
    xmlns:app="http://schemas.android.com/apk/res-auto">
    <item
        android:id="@+id/action_settings"
        android:title="Settings"
        android:icon="@drawable/ic_settings"
        app:showAsAction="ifRoom" />
</menu>
Load the menu in your activity:
@Override
public boolean onCreateOptionsMenu(Menu menu) {
    getMenuInflater().inflate(R.menu.toolbar_menu, menu);
    return true;
}
5. Custom Layout in ActionBar
Example custom_actionbar.xml:
<TextView
    android:layout_width="wrap_content"
    android:layout_height="wrap_content"
    android:text="My Custom Title"
    android:textColor="@android:color/white"
    android:textSize="20sp" />
You can use a custom layout if you still want to use ActionBar directly:
ActionBar actionBar = getSupportActionBar();
if (actionBar != null) {
    actionBar.setDisplayOptions(ActionBar.DISPLAY_SHOW_CUSTOM);
    actionBar.setCustomView(R.layout.custom_actionbar);
}
6. Best Practices
- Prefer Toolbar over ActionBar for flexibility.
- Always test on multiple devices.
- Use
Theme.MaterialComponentsfor modern look. - Avoid hardcoded strings (use
strings.xml).
Conclusion
Now you know how to customize Toolbar and ActionBar in Android Studio using Java. This can drastically improve the user interface of your app and offer better branding and navigation control.
- Title: In Java or XML (
app:title="My Title") - Text Color:
app:titleTextColor - Background Color:
android:background - Elevation/Shadow:
android:elevation - Icons: Add icons via menu resources.
- Title: In Java or XML (
4. Create a Menu for Toolbar
Create a file in res/menu/toolbar_menu.xml:
<?xml version="1.0" encoding="utf-8"?>
<menu xmlns:android="http://schemas.android.com/apk/res/android"
    xmlns:app="http://schemas.android.com/apk/res-auto">
    <item
        android:id="@+id/action_settings"
        android:title="Settings"
        android:icon="@drawable/ic_settings"
        app:showAsAction="ifRoom" />
</menu>
Load the menu in your activity:
@Override
public boolean onCreateOptionsMenu(Menu menu) {
    getMenuInflater().inflate(R.menu.toolbar_menu, menu);
    return true;
}
5. Custom Layout in ActionBar
Example custom_actionbar.xml:
<TextView
    android:layout_width="wrap_content"
    android:layout_height="wrap_content"
    android:text="My Custom Title"
    android:textColor="@android:color/white"
    android:textSize="20sp" />
You can use a custom layout if you still want to use ActionBar directly:
ActionBar actionBar = getSupportActionBar();
if (actionBar != null) {
    actionBar.setDisplayOptions(ActionBar.DISPLAY_SHOW_CUSTOM);
    actionBar.setCustomView(R.layout.custom_actionbar);
}
6. Best Practices
- Prefer Toolbar over ActionBar for flexibility.
- Always test on multiple devices.
- Use
Theme.MaterialComponentsfor modern look. - Avoid hardcoded strings (use
strings.xml).
Conclusion
Now you know how to customize Toolbar and ActionBar in Android Studio using Java. This can drastically improve the user interface of your app and offer better branding and navigation control.
- Title: In Java or XML (
app:title="My Title") - Text Color:
app:titleTextColor - Background Color:
android:background - Elevation/Shadow:
android:elevation - Icons: Add icons via menu resources.
- Title: In Java or XML (
4. Create a Menu for Toolbar
Create a file in res/menu/toolbar_menu.xml:
<?xml version="1.0" encoding="utf-8"?>
<menu xmlns:android="http://schemas.android.com/apk/res/android"
    xmlns:app="http://schemas.android.com/apk/res-auto">
    <item
        android:id="@+id/action_settings"
        android:title="Settings"
        android:icon="@drawable/ic_settings"
        app:showAsAction="ifRoom" />
</menu>
Load the menu in your activity:
@Override
public boolean onCreateOptionsMenu(Menu menu) {
    getMenuInflater().inflate(R.menu.toolbar_menu, menu);
    return true;
}
5. Custom Layout in ActionBar
Example custom_actionbar.xml:
<TextView
    android:layout_width="wrap_content"
    android:layout_height="wrap_content"
    android:text="My Custom Title"
    android:textColor="@android:color/white"
    android:textSize="20sp" />
You can use a custom layout if you still want to use ActionBar directly:
ActionBar actionBar = getSupportActionBar();
if (actionBar != null) {
    actionBar.setDisplayOptions(ActionBar.DISPLAY_SHOW_CUSTOM);
    actionBar.setCustomView(R.layout.custom_actionbar);
}
6. Best Practices
- Prefer Toolbar over ActionBar for flexibility.
- Always test on multiple devices.
- Use
Theme.MaterialComponentsfor modern look. - Avoid hardcoded strings (use
strings.xml).
Conclusion
Now you know how to customize Toolbar and ActionBar in Android Studio using Java. This can drastically improve the user interface of your app and offer better branding and navigation control.
- Title: In Java or XML (
app:title="My Title") - Text Color:
app:titleTextColor - Background Color:
android:background - Elevation/Shadow:
android:elevation - Icons: Add icons via menu resources.
- Title: In Java or XML (
4. Create a Menu for Toolbar
Create a file in res/menu/toolbar_menu.xml:
<?xml version="1.0" encoding="utf-8"?>
<menu xmlns:android="http://schemas.android.com/apk/res/android"
    xmlns:app="http://schemas.android.com/apk/res-auto">
    <item
        android:id="@+id/action_settings"
        android:title="Settings"
        android:icon="@drawable/ic_settings"
        app:showAsAction="ifRoom" />
</menu>
Load the menu in your activity:
@Override
public boolean onCreateOptionsMenu(Menu menu) {
    getMenuInflater().inflate(R.menu.toolbar_menu, menu);
    return true;
}
5. Custom Layout in ActionBar
Example custom_actionbar.xml:
<TextView
    android:layout_width="wrap_content"
    android:layout_height="wrap_content"
    android:text="My Custom Title"
    android:textColor="@android:color/white"
    android:textSize="20sp" />
You can use a custom layout if you still want to use ActionBar directly:
ActionBar actionBar = getSupportActionBar();
if (actionBar != null) {
    actionBar.setDisplayOptions(ActionBar.DISPLAY_SHOW_CUSTOM);
    actionBar.setCustomView(R.layout.custom_actionbar);
}
6. Best Practices
- Prefer Toolbar over ActionBar for flexibility.
- Always test on multiple devices.
- Use
Theme.MaterialComponentsfor modern look. - Avoid hardcoded strings (use
strings.xml).
Conclusion
Now you know how to customize Toolbar and ActionBar in Android Studio using Java. This can drastically improve the user interface of your app and offer better branding and navigation control.