Wireless Arduino Appliance Control A Comprehensive Guide
Wireless Arduino appliance control offers a compelling way to automate and remotely manage home appliances. This guide explores the fascinating world of using Arduino boards to control devices wirelessly, from the fundamental principles to practical implementation details. We’ll delve into the advantages of this approach, examine various wireless communication protocols, and discuss practical use cases, hardware setup, and software development.
This guide provides a practical understanding of the steps involved in designing, building, and programming a wireless Arduino appliance control system. It covers everything from choosing the right hardware components and setting up wireless communication to writing efficient Arduino code and implementing error handling. By the end, you’ll be equipped with the knowledge and tools to create your own intelligent, automated home appliance system.
Introduction to Wireless Arduino Appliance Control
Wireless Arduino appliance control leverages the power of Arduino microcontrollers and wireless communication protocols to remotely manage home appliances. This allows for automated control and greater convenience in everyday tasks. The core concept involves programming the Arduino to receive commands over a wireless network and translate those commands into actions for connected appliances.The basic principles involve connecting sensors to the Arduino to gather information about the environment and appliances.
The microcontroller then processes this data and, based on pre-programmed instructions, sends commands over the wireless network to control the appliances. These commands can be triggered by user input, time-based schedules, or environmental conditions. The wireless component ensures flexibility and freedom from physical wiring limitations.
Advantages of Wireless Communication
Wireless communication offers significant advantages in appliance control applications. It eliminates the need for extensive wiring, enabling greater flexibility in placement and configuration of appliances. This approach facilitates easier maintenance and future upgrades. The wireless aspect also promotes user convenience, enabling remote control and automation of tasks.
Common Use Cases
Wireless Arduino appliance control finds applications in diverse scenarios. Automated lighting systems are a prime example, where the Arduino can adjust lighting intensity based on time of day or ambient light levels. Smart home thermostats, remotely controlled by the user, offer greater comfort and energy efficiency. Security systems, monitored and triggered by the Arduino, can provide advanced protection.
Comparison of Wireless Communication Protocols
Different wireless communication protocols offer varying capabilities and characteristics. A suitable choice depends on the specific requirements of the application. The following table summarizes some common protocols for Arduino appliance control.
| Protocol | Pros | Cons | Use Case |
|---|---|---|---|
| WiFi | Widely available, high bandwidth, good range, easy to implement with Arduino libraries | Requires a WiFi network, potential security concerns, power consumption can be higher than some other protocols | Controlling multiple appliances in a large home, integration with existing smart home ecosystems |
| Bluetooth | Low power consumption, short range, easy pairing | Limited range, not ideal for large-scale applications, slower data transfer rates than WiFi | Controlling appliances in close proximity, applications requiring low power consumption |
| Zigbee | Low power consumption, robust mesh networking, good range | Slower data rates, can be more complex to implement | Controlling numerous sensors and appliances in a home environment, suitable for home automation |
| Z-Wave | Good range, robust mesh networking, relatively low power consumption | Can be more complex to implement than WiFi or Bluetooth, limited compatibility with other systems | Controlling appliances in a home environment, suitable for home automation |
Hardware Components and Setup
This section details the necessary hardware components for a wireless Arduino appliance control system, emphasizing selection criteria for the Arduino board and the wireless communication module. Proper setup and configuration are crucial for a functional and reliable system.The wireless Arduino appliance control system requires careful selection of components and meticulous setup. This ensures the system functions reliably and efficiently, controlling appliances wirelessly.
Essential Hardware Components
The system requires a microcontroller (Arduino board), a wireless communication module, and necessary sensors and actuators for interacting with the appliance. Choosing the right components ensures compatibility and optimal performance.
- Arduino Board: The Arduino board acts as the central processing unit, controlling the system and communicating with the wireless module. Selecting the appropriate Arduino board depends on the project’s complexity and the desired processing power.
- Wireless Communication Module: This module enables wireless communication between the Arduino board and a control device (e.g., smartphone app). Several wireless communication technologies are available, such as WiFi or Bluetooth. The choice depends on the project’s needs and the range required.
- Sensors and Actuators: These components are used to interact with the appliance. Sensors monitor the appliance’s state (e.g., temperature, light level), and actuators control the appliance’s operation (e.g., turning a switch on/off).
- Power Supply: A reliable power supply is necessary to power the Arduino board, wireless module, and other components.
- Connecting Wires: Appropriate connecting wires are essential to link the components together.
Arduino Board Selection Criteria
The choice of Arduino board depends on the complexity of the project and the required processing power. For simple applications, a basic Arduino Nano or Uno might suffice. More demanding tasks might require a Mega or other advanced models. Consider the amount of memory, input/output pins, and processing speed when making your selection.
Wireless Communication Module Setup
The wireless communication module must be correctly configured and connected to the Arduino board. This process involves installing the necessary drivers and configuring the communication protocol. Ensure the module is compatible with the chosen Arduino board.
Arduino Code Configuration
The Arduino code needs to be configured to communicate with the wireless module. This includes establishing a connection, sending commands, and receiving responses. The code should be tailored to the specific wireless communication protocol being used.
Hardware Component Specifications
| Component | Description | Specifications |
|---|---|---|
| Arduino Nano | Microcontroller board | ATmega328P, 16MHz, 20 digital input/output pins, 12 analog input pins |
| ESP32 | Wireless communication module | WiFi, Bluetooth, 240MHz dual-core processor, 520KB RAM |
| Relay Module | Actuator for controlling appliances | 5V DC, 250VAC, 10A |
| Power Supply | Provides power to the circuit | 5V DC, 1A |
Hardware Assembly Procedure
- Connect the Power Supply: Connect the power supply to the Arduino board and the wireless module, ensuring proper polarity.
- Connect the Wireless Module: Connect the wireless module to the Arduino board using appropriate jumper wires. Refer to the module’s datasheet for correct pin connections.
- Connect Sensors and Actuators: Connect sensors and actuators to the Arduino board according to the circuit diagram. Ensure correct pin connections.
- Wire the Relay Module: Connect the relay module to the Arduino board, using the appropriate pins for controlling the appliance.
- Test the Connections: After connecting all components, test the connections to ensure proper communication between the components.
- Upload the Arduino Code: Upload the Arduino code to the microcontroller. Ensure the code is tailored to the selected wireless module and the appliance being controlled.
Software Development and Programming
Programming your Arduino-controlled appliances involves using a specific language and structure. This section details the essential aspects of software development, including the choice of programming languages, sample code for wireless communication, and the structure of appliance control code. It also addresses the use of libraries, error handling, and user interface integration.
Programming Languages, Wireless Arduino appliance control
Arduino primarily uses Wiring, a dialect of C++. Its syntax is relatively straightforward, making it accessible to beginners while offering sufficient power for complex applications. The C++ language provides flexibility and control over hardware interactions. Other languages like Python, although not native to Arduino, can be used with intermediary tools, offering advantages in terms of ease of development and debugging, though performance might be a consideration.
Wireless Communication Examples
Several libraries support wireless communication protocols like WiFi. These libraries abstract away the complexities of low-level communication, enabling the focus on the application logic. An example using the ESP8266 WiFi module would involve initializing the WiFi connection, sending data to a server, and receiving commands.
Arduino Code Structure
Arduino code typically comprises setup() and loop() functions. The setup() function runs once during initialization, configuring the necessary components, including serial communication and WiFi connection. The loop() function runs repeatedly, monitoring input, executing commands, and controlling the appliance. The structure is straightforward and promotes modularity.
Libraries for Simplifying Programming
Libraries simplify the programming process by providing pre-built functions for common tasks. For example, the `WiFi` library streamlines WiFi interactions, while libraries like `Servo` handle motor control. These libraries reduce code complexity and development time.
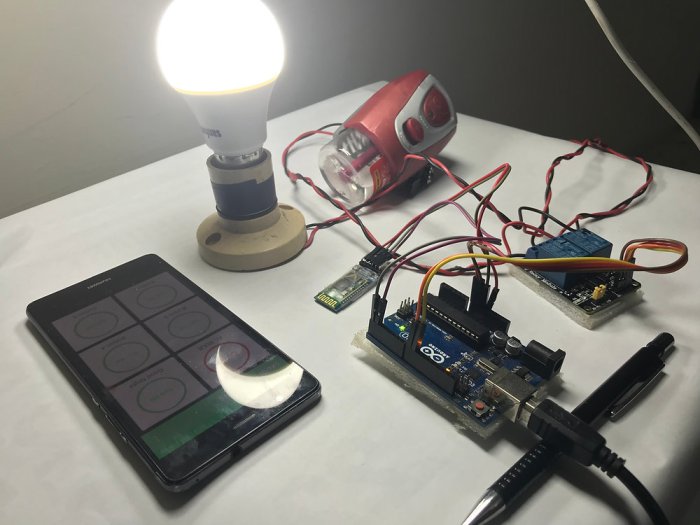
Code Examples for Specific Appliances
Controlling a light bulb might involve using digital pins to activate the relay controlling the bulb. The code would include functions to read the state of a button or input, and to turn the light on or off based on the input. Controlling a motor might involve using a servo library to precisely position the motor.
Error Handling
Robust error handling is crucial. The code should check for unexpected inputs, communication failures, and other potential issues. For instance, if a WiFi connection fails, the code should log the error and attempt to reconnect. This prevents unexpected behavior and provides feedback.
User Interface Integration
A user interface (UI) allows remote control. This could be a web application or a mobile app communicating with the Arduino via a server. The UI handles user input, and the Arduino receives and processes the commands.
Programming Process Steps
| Step | Description |
|---|---|
| 1 | Define the appliance’s functionality and desired remote control features. |
| 2 | Choose the appropriate hardware components, including the Arduino board, wireless module, and appliance interface. |
| 3 | Install the necessary libraries and configure the wireless connection. |
| 4 | Develop the Arduino code, including setup() and loop() functions, incorporating error handling and UI interaction. |
| 5 | Test the code thoroughly to ensure proper operation and responsiveness. |
| 6 | Implement a user interface for remote control, whether a web application or mobile app. |
| 7 | Deploy the system and monitor its performance. |
Wireless Communication Protocols
Source: wixstatic.com
Choosing the right wireless communication protocol is crucial for reliable and efficient Arduino appliance control. Factors like range, power consumption, security, and the complexity of the application influence the selection. This section explores various protocols suitable for Arduino-based home automation, comparing their strengths and weaknesses.
Comparison of Wireless Protocols
Different wireless communication protocols offer varying capabilities and trade-offs. Understanding these differences is vital for selecting the optimal protocol for a given application.
- WiFi: WiFi, a widely used standard, provides high data rates and extensive range, but consumes significant power compared to other options. It’s suitable for applications requiring substantial bandwidth, like streaming video or handling numerous connected devices. Its range is typically greater than Bluetooth, but can be affected by obstacles and interference. Security is robust when implemented correctly, leveraging WPA2 or WPA3 encryption.
Implementation often involves integrating a WiFi shield or module into the Arduino and configuring the necessary network settings. Coding typically involves libraries for the chosen WiFi library and establishing a connection to the network. For example, connecting a smart light to a home WiFi network for remote control.
- Bluetooth: Bluetooth offers a more modest range compared to WiFi, but generally consumes less power, making it ideal for applications with limited power resources. It’s well-suited for short-range interactions, such as controlling appliances in a confined area. Bluetooth’s reliability is often adequate for simple applications, but can degrade in noisy environments. Security is relatively straightforward to implement, but it might not be as robust as WiFi’s encryption schemes.
Implementing Bluetooth requires a Bluetooth module or shield and involves configuring the connection parameters. Coding typically involves using Bluetooth libraries to establish a connection and exchange data. An example of this is controlling a small appliance in a home office with a Bluetooth-enabled controller.
- Zigbee: Zigbee, designed for low-power, low-data-rate applications, excels in battery-operated devices. It’s known for its robust mesh networking capabilities, which allow for increased range and reliability through multiple nodes. Zigbee’s range is generally less than WiFi but often surpasses Bluetooth’s. Security features are built into the protocol, although the security strength can vary depending on the implementation.
Implementation necessitates a Zigbee module or shield and careful configuration of the network. Coding usually involves Zigbee libraries to manage the network and communication. A common application is controlling lighting fixtures in a home with multiple Zigbee-enabled bulbs.
Range and Reliability
The range and reliability of a wireless protocol are significant factors in appliance control applications. These characteristics depend on the environment and the specific implementation.
| Protocol | Range (typical) | Reliability | Factors Affecting Range and Reliability |
|---|---|---|---|
| WiFi | 100+ meters (open area) | High | Obstacles, interference, network congestion |
| Bluetooth | 10-15 meters (open area) | Moderate | Obstacles, interference, signal strength |
| Zigbee | 50-100 meters (with mesh) | High (with mesh) | Obstacles, interference, node failures |
Security Considerations
Security is crucial for protecting sensitive data and preventing unauthorized access. Appropriate security measures should be implemented in each protocol’s implementation.
- WiFi: Robust security protocols like WPA2 or WPA3 should be utilized. Properly configuring network passwords and encryption is essential. Avoid using default passwords and consider enabling network access control.
- Bluetooth: Security mechanisms, like pairing and encryption, should be employed. Implement strong pairing codes and consider security enhancements provided by Bluetooth specifications.
- Zigbee: Zigbee’s security features, like encryption and authentication, should be configured appropriately. Use strong keys and consider advanced security options provided by the protocol.
Power Consumption
Power consumption is a critical aspect for battery-operated devices. Different protocols have varying power requirements.
- WiFi: WiFi typically consumes more power due to its higher data rates and processing requirements.
- Bluetooth: Bluetooth generally consumes less power compared to WiFi, suitable for battery-powered applications.
- Zigbee: Zigbee is designed for low-power operation, making it ideal for battery-powered devices.
Implementation Details
Implementing each protocol requires specific steps and considerations.
- WiFi: Integrating a WiFi shield or module, configuring the network settings, and utilizing relevant libraries are crucial steps. A detailed example would involve code for establishing a connection, sending data, and receiving responses.
- Bluetooth: Using a Bluetooth module or shield, configuring the connection parameters, and utilizing Bluetooth libraries are essential. An example code snippet would demonstrate establishing a connection, sending commands, and receiving responses.
- Zigbee: Integrating a Zigbee module or shield, configuring the network, and utilizing Zigbee libraries are essential. An example of code would involve managing the network, sending data, and receiving acknowledgments.
Coding Examples
Illustrative code examples can demonstrate the implementation of each protocol. Detailed coding examples are beyond the scope of this document.
Troubleshooting and Maintenance
Maintaining a wireless Arduino appliance control system requires a proactive approach to identify and resolve potential issues. Proper maintenance ensures optimal performance and longevity of the system, while troubleshooting helps in swiftly resolving problems when they arise. Regular checks and firmware updates are crucial for the system’s stability and reliability.
Potential Issues in a Wireless System
Common issues in wireless Arduino appliance control systems often stem from communication problems, hardware malfunctions, or software glitches. Radio interference, weak signal strength, or damaged components can disrupt the connection between the Arduino and the appliance. Software bugs or incompatibility between the Arduino code and the appliance’s control protocol may also lead to unexpected behaviors.
Troubleshooting Common Problems
A systematic approach to troubleshooting is key to identifying the root cause of a problem. First, verify the power supply to the Arduino and the appliance. Check for physical damage to the components. If the issue persists, consider the wireless communication channel. Verify the signal strength of the wireless connection.
Check the Arduino code for potential errors, ensuring compatibility with the appliance’s control protocol. Examine the appliance’s control system for any issues. If necessary, consult the appliance’s documentation for troubleshooting steps.
Maintaining Optimal Performance
Maintaining the system involves several routine procedures. Regularly inspect the hardware components for signs of wear or damage. Ensure proper ventilation around the system to prevent overheating. Clean the antenna to maintain optimal signal reception. Check for any signs of moisture or corrosion.
Regularly back up your code and configurations.
Upgrading Firmware
Firmware upgrades enhance the system’s functionality and security. Download the latest firmware version from the project’s website or repository. Carefully follow the upgrade instructions. Back up the existing firmware before proceeding. Upload the new firmware to the Arduino board.
Test the upgraded system to ensure proper functionality.
Routine Checks
Regular checks are essential for maintaining the system’s health and stability. Verify the wireless signal strength. Inspect the Arduino board for any signs of damage. Monitor the appliance’s operational status. Verify the system’s responsiveness.
Record any anomalies observed.
Repairing or Replacing Components
If a component fails, proper repair or replacement is necessary. Identify the faulty component. Consult the component’s datasheet or the project’s documentation for repair procedures. If the component is beyond repair, replace it with a compatible component. Ensure proper installation of the replacement part.
Retest the system after any repairs or replacements.
Concluding Remarks
In conclusion, wireless Arduino appliance control presents a powerful and versatile approach to home automation. This guide has highlighted the key concepts, components, and considerations for building such a system, including the various wireless protocols, hardware setup, software development, and design considerations. The practical examples and troubleshooting strategies will empower you to create a customized system that meets your specific needs and preferences.
Furthermore, the detailed breakdown of different appliance types suitable for remote control provides a clear picture of the diverse applications possible.


Post Comment