Record And Edit Podcasts With Audacity
Record and edit podcasts with Audacity, a powerful and versatile tool for podcast creators. This comprehensive guide covers everything from basic recording techniques to advanced mixing and mastering, equipping you with the skills to produce high-quality podcasts. Learn how to utilize Audacity’s user-friendly interface and various features to enhance your podcast’s sound.
The guide will walk you through the process of recording, editing, mixing, and mastering your podcast using Audacity. From choosing the right microphone to mastering your final product, you’ll discover how to produce a polished and professional-sounding podcast. The step-by-step instructions and practical examples will empower you to create podcasts that stand out from the crowd.
Introduction to Audacity for Podcast Recording and Editing
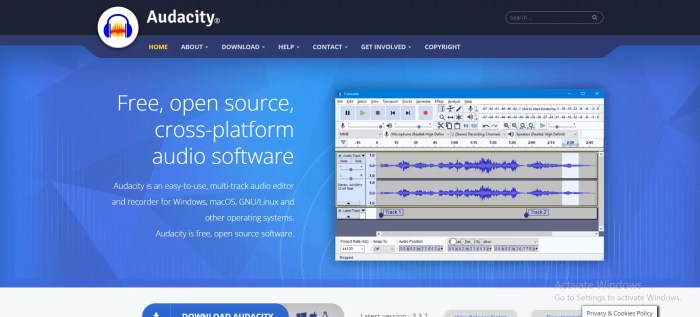
Audacity is a free and open-source audio editor that’s a popular choice for podcasters due to its versatility and ease of use. It offers a wide range of tools for recording, editing, and mixing audio, making it suitable for both beginners and experienced podcasters. Its intuitive interface and extensive features make it a powerful tool for anyone looking to create high-quality podcasts.This overview will provide a basic understanding of Audacity, its features relevant to podcasting, and the fundamental steps involved in using the software for podcast creation.
We’ll also examine the essential tools within Audacity’s user interface.
Audacity’s Core Features for Podcasting
Audacity’s capabilities extend beyond simple audio editing, making it a complete solution for podcast production. Its recording capabilities are robust and compatible with various audio input devices. Editing features allow for precise adjustments to audio files, including trimming, cutting, and adding effects. Mixing is a critical aspect of podcasting, and Audacity provides tools to blend multiple audio tracks and achieve a polished final product.
The export function is crucial for distributing the podcast, allowing for different formats and quality settings.
Basic Steps for Recording a Podcast with Audacity
The recording process with Audacity is straightforward. First, ensure the audio input device is correctly selected within Audacity. Next, adjust the recording levels to prevent distortion. Finally, initiate the recording and proceed with the podcast session.
Audacity’s User Interface: Essential Tools for Podcast Creation
Audacity’s interface is organized logically, making it easy to navigate. The main window displays the audio waveform, which visually represents the audio data. Essential tools for podcast creation are conveniently located. The timeline, located at the bottom of the main window, allows for precise editing of audio segments. The toolbar provides quick access to common commands and functions.
The various menus provide access to advanced options and settings.
Summary of Audacity Features for Podcasting
| Feature | Description |
|---|---|
| Recording | Captures audio from microphones or other audio sources. |
| Editing | Allows trimming, cutting, and manipulation of audio segments. |
| Mixing | Combines multiple audio tracks, adjusting volume and effects. |
| Exporting | Saves the podcast in various formats (e.g., MP3, WAV) for distribution. |
Recording Audio with Audacity
Recording audio in Audacity for podcasting is straightforward. This process involves selecting the appropriate input method, adjusting levels for optimal sound, and troubleshooting potential issues. Understanding these steps will help you capture high-quality audio recordings that enhance your podcast’s overall production.Audacity supports various audio input methods, allowing flexibility in your recording setup. Different methods offer varying levels of control and quality, each with its own advantages.
By choosing the right method and adjusting settings appropriately, you can significantly improve the audio quality of your podcast.
Audio Input Methods
Audacity provides several ways to capture audio for your podcast. These methods range from simple microphone connections to more complex setups involving audio interfaces.
- Direct Microphone Connection: This is the most common and straightforward method. Simply connect your microphone directly to your computer’s audio input jack. This method is user-friendly and often sufficient for basic podcasting needs.
- Audio Interface: Using an audio interface allows for more control over your audio signal. This typically involves connecting your microphone to the interface, and then connecting the interface to your computer. Audio interfaces often provide more input options, better signal quality, and more control over gain levels and other parameters.
- Line-in Input: This method is useful for recording audio from external sources like instruments, other audio devices, or even a phone. It’s a versatile option when integrating diverse sound elements into your podcast.
Adjusting Audio Levels and Settings
Properly adjusting audio levels and settings during recording is crucial for maintaining consistent quality throughout your podcast.
- Gain Control: The gain control adjusts the input signal strength before it enters Audacity. Setting an appropriate gain level is important to avoid clipping or distortion, which can harm the overall quality of your recording.
- Monitoring: Continuously monitoring the audio during recording is vital. This allows you to gauge the volume levels and make adjustments to ensure a consistent listening experience.
- Input Device Selection: Ensure the correct input device is selected in Audacity’s settings. This step ensures that the software is capturing audio from the intended source.
Troubleshooting Recording Issues
Troubleshooting recording issues can be addressed with a structured approach.
- Poor Audio Quality: Poor audio quality can stem from several factors, including a weak signal from the input device, or an unsuitable recording environment. Check the input level, recording environment, and your microphone.
- Dropped Audio: If audio is dropping out during recording, it could be due to a problem with your computer’s audio drivers, or insufficient buffering. Restart your computer and check the audio settings.
- Feedback or Distortion: Excessive feedback or distortion can occur due to improper gain settings. Adjust the gain control on your audio interface or microphone and use a quieter recording environment.
Optimizing Recording Environments
Optimizing your recording environment is key to achieving high-quality audio recordings.
- Background Noise Reduction: Minimizing background noise is crucial. Isolate your recording space from external distractions such as traffic noise, loud appliances, or other conversations.
- Acoustic Treatment: Adding acoustic treatment to your recording environment, such as soundproofing materials, can help minimize echoes and reverberations.
- Equipment Placement: Proper placement of your microphone and other recording equipment can significantly impact the audio quality. Experiment with different positions to find the optimal setup for your recording space.
Comparison of Audio Input Devices
This table provides a comparative overview of different audio input devices suitable for podcasting with Audacity.
| Device | Pros | Cons | Suitable for |
|---|---|---|---|
| USB Microphone (e.g., Blue Yeti) | Easy to set up, affordable options available | May not offer extensive control | Beginners, casual podcasters |
| Audio Interface (e.g., Focusrite Scarlett) | More control over audio levels, professional sound | More expensive, setup can be slightly more complex | Experienced podcasters, higher-quality recordings |
| External Microphone with XLR cable | Higher quality audio, often better for professional setups | Requires an audio interface, more setup | Professional podcasters, high-quality sound |
Editing Podcast Audio in Audacity: Record And Edit Podcasts With Audacity
Audacity, a free and open-source audio editor, offers a powerful suite of tools for podcasters to refine their recordings. From basic adjustments to complex manipulations, Audacity enables precise control over audio quality, ensuring a polished and professional final product. Mastering these editing techniques significantly elevates the listening experience for your audience.
Audio Editing Tools in Audacity
Audacity’s interface provides a variety of tools for audio manipulation. Essential tools include the Selection Tool, the Cut Tool, the Copy Tool, and the Paste Tool for basic trimming and manipulation. More advanced features, like the Time Shift Tool and the Fade Tools, allow for intricate audio adjustments. The ability to precisely manipulate audio segments is crucial for achieving a seamless and engaging podcast.
Trimming, Cutting, and Pasting Audio Segments
These fundamental editing techniques allow podcasters to refine their recordings. First, select the portion of the audio you wish to trim. Then, use the “Cut” tool to remove unwanted sections. Finally, use the “Paste” tool to re-integrate selected segments. Audacity allows for precise segment placement and manipulation, ensuring accurate synchronization and a smooth flow in your podcast.
Examples include removing introductory greetings, or awkward silences.
Removing Unwanted Noises and Background Sounds
Noise reduction is an important step in audio editing. Audacity’s Noise Reduction tool is designed to identify and eliminate unwanted background noise. The tool allows for adjustments in settings to target specific frequencies or characteristics of the noise, and you can use the “Noise Reduction” tool to effectively remove unwanted sounds.
Applying Audio Effects
Audacity provides various audio effects, such as equalization and compression. Equalization allows adjustments to the audio’s frequency balance. This can enhance clarity and presence. Compression helps to control dynamic range and create a consistent volume level. Applying effects can significantly impact the overall tone and quality of your podcast, and mastering these techniques is essential for crafting a high-quality listening experience.
Enhancing Audio Clarity and Presence
Audacity offers tools for improving audio clarity and presence. The Equalization tool can be used to highlight specific frequency ranges, making vocals and instruments stand out. Similarly, effects like compression and normalization can help achieve a consistent sound level across your podcast. Using Audacity to enhance these elements can greatly improve the listener’s enjoyment.
Comparison of Audio Editing Techniques
| Technique | Description | Effect on Podcast |
|---|---|---|
| Trimming | Removing unwanted portions of audio | Removes unnecessary parts, improves flow |
| Cutting and Pasting | Removing and inserting segments | Allows rearranging segments, creating a smoother flow |
| Noise Reduction | Removing unwanted background noise | Improves audio clarity, reduces distractions |
| Equalization | Adjusting audio frequencies | Improves balance, clarity, and presence |
| Compression | Controlling audio dynamic range | Creates a consistent volume level, reduces harshness |
Mixing and Mastering Podcast Audio with Audacity
Podcast production demands meticulous attention to detail, especially in the mixing and mastering phases. This crucial step refines the audio, ensuring a professional and engaging listening experience for your audience. Audacity, a powerful yet user-friendly tool, empowers you to achieve this level of audio quality.Effective mixing and mastering go beyond simply combining audio tracks. It’s about carefully balancing sounds, adjusting levels, and applying effects to create a cohesive and impactful listening experience.
This process enhances the clarity and impact of your podcast’s content.
Mixing Different Audio Tracks
Mixing involves combining the various audio tracks within a podcast, such as the host’s voice, guest interviews, sound effects, and music. Careful attention to the level and balance of each track is essential. Mixing aims to create a harmonious blend of all sounds, preventing any one track from dominating or being inaudible.
Balancing Audio Levels
Precise audio level balancing is critical for a professional-sounding podcast. Each track’s volume should be adjusted to create a consistent and balanced listening experience across the entire recording. A technique frequently employed is the use of a volume meter to monitor and adjust levels. This ensures that no sound is too loud or too soft, creating an enjoyable listening experience for the audience.
Using Audacity’s built-in volume controls and gain adjustments are key tools to achieve this balance.
The Role of Mastering in Podcast Production
Mastering is the final stage of audio post-production, ensuring the overall audio quality is optimal for various playback systems. It involves applying final adjustments to the audio, such as equalization, compression, and limiting, to create a consistent and professional sound across different platforms and devices. Mastering ensures a high-quality listening experience regardless of where the audience listens to the podcast.
Using Audacity’s Effects for a Polished Product
Audacity offers a range of effects to enhance the final product’s quality. These effects include EQ (equalization), compression, and reverb, which can shape the overall sound. EQ is used to boost or cut specific frequencies to create a balanced sound. Compression controls dynamic range to reduce the difference between loud and quiet parts, and reverb adds a sense of space and ambience to the audio.
These tools allow you to fine-tune the sound to your specific needs and create a polished final product.
Adjusting Audio Levels for Different Output Formats
Different output formats (e.g., MP3, WAV, AAC) have varying bitrates and sample rates. Adjusting audio levels is necessary to ensure that the audio quality remains consistent across these formats. Understanding the characteristics of each format is crucial for making informed decisions during mastering.
Optimizing Audio for Various Playback Devices
The listening experience can vary based on the playback device. Audacity offers the ability to adjust audio levels to compensate for differences in speakers or headphones. This involves considering factors such as the dynamic range and frequency response of the playback device. Using Audacity’s tools to optimize audio for different playback devices ensures a consistent and enjoyable listening experience.
Mixing and Mastering Techniques in Audacity
| Technique | Description | Audacity Application |
|---|---|---|
| Equalization (EQ) | Adjusting the volume of different frequency ranges | Audacity’s EQ effects |
| Compression | Reducing the dynamic range of the audio | Audacity’s compressor effects |
| Limiting | Preventing audio peaks from exceeding a certain threshold | Audacity’s limiter effects |
| Reverb | Adding a sense of space and ambience to the audio | Audacity’s reverb effects |
| Normalization | Adjusting the overall volume level | Audacity’s normalize function |
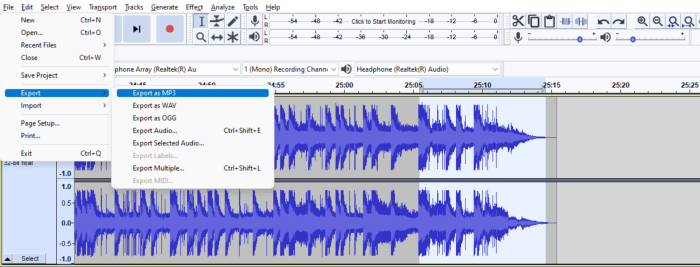
Exporting Podcast Audio from Audacity
Source: surferseo.art
Exporting your podcast audio from Audacity is a crucial step in the process. Proper export ensures your listeners can enjoy your podcast on various platforms and devices without issues. Choosing the right audio format and settings is essential for optimal quality and compatibility.
Supported Audio Formats
Audacity supports a variety of audio formats for export, each with its own characteristics. Understanding these formats is key to selecting the best option for your podcast. Common formats include WAV, AIFF, MP3, OGG, and more. Each format has advantages and disadvantages in terms of file size, quality, and compatibility with different playback devices and platforms.
Choosing the Right Format for Different Platforms
The choice of audio format significantly impacts how your podcast plays on various platforms. For instance, MP3 is a widely used format due to its compatibility with most players and devices. However, it might result in some loss of audio quality compared to formats like WAV or AIFF. Platforms like Apple Podcasts often prefer specific formats. For maximum compatibility, consider exporting in multiple formats and adapting to platform-specific guidelines.
Audio Quality and File Size Considerations
Audio quality is paramount for a professional-sounding podcast. Higher bitrates and sample rates generally result in better quality but larger file sizes. Finding a balance between quality and file size is crucial. Large file sizes can affect download times and streaming quality. Choose the settings that provide a good compromise between the two.
Exporting Audio in Different Bitrates and Sample Rates
Audacity allows you to control the bitrate and sample rate during export. A higher bitrate means more data per second, leading to higher quality but larger file sizes. The sample rate, often measured in kHz (kilohertz), represents the number of audio samples captured per second. A higher sample rate captures more detail but results in larger files.
Experiment with different settings to determine the optimal balance for your podcast.
Optimizing Exported Files for Streaming and Download
Optimizing exported files for streaming and download is crucial for a seamless listening experience. For streaming, smaller file sizes are important for quicker loading times. For downloads, a balance between quality and size is required. Consider using appropriate compression methods to minimize file size without sacrificing too much quality.
Summary Table of Audio Export Formats, Record and edit podcasts with Audacity
| Format | Suitability for Podcast Distribution | Pros | Cons |
|---|---|---|---|
| WAV | Excellent quality, but large file sizes | High fidelity audio, lossless | Large file sizes, not widely supported on all devices |
| AIFF | Excellent quality, but large file sizes | High fidelity audio, lossless | Not as widely supported as WAV |
| MP3 | Good balance of quality and size, very common | Small file sizes, compatible with most players | Lossy compression, some quality loss |
| OGG | Good quality, lossless option, good compromise | Lossless compression, reasonable file size | Not as widely supported as MP3 on some devices |
Advanced Audacity Techniques for Podcast Production
Source: tchelete.com
This section delves into advanced audio editing techniques that elevate podcast production beyond basic recording and editing. These techniques can significantly enhance the professional quality and listener experience of your podcast. Mastering these methods will empower you to create a truly unique and polished sound.Advanced audio editing techniques are crucial for podcasting because they allow for the meticulous refinement of audio quality, which in turn contributes to a more engaging and professional listening experience.
Employing these methods ensures that your podcast stands out from the crowd.
Noise Reduction Techniques
Noise reduction is a vital tool for removing unwanted background sounds during recording. Audacity offers various noise reduction tools to address a wide array of noise characteristics. Understanding these techniques can significantly improve the clarity and quality of your podcast recordings. Careful selection and implementation of noise reduction algorithms are paramount to achieving optimal results.
- Identifying and Targeting Noise: Audacity allows precise selection of the unwanted noise characteristics in your audio. This enables targeted noise reduction, preserving the desired audio while effectively eliminating the unwanted sound. Identifying the specific frequency range of the noise is key to effectively targeting it. Identifying and targeting the noise accurately ensures the reduction process minimizes distortion and preserves the overall quality of the podcast.
- Noise Profile Creation: Audacity’s noise reduction tools often require a “noise profile.” This profile represents the characteristics of the unwanted noise, allowing the software to identify and remove it accurately from the recorded audio. A precise noise profile is critical for accurate reduction, minimizing artifacts and preserving the original audio quality.
- Using the Noise Reduction Tool: Audacity’s noise reduction tool typically involves selecting a section of the audio containing only the unwanted noise and then using that as a reference to identify and remove the same noise from other sections of the recording. Understanding the parameters and limitations of the tool ensures that it is used effectively and efficiently.
Audio Restoration Techniques
Audio restoration techniques are used to repair damaged or degraded audio files. These techniques can help revive old recordings, correct errors, and enhance the clarity of existing audio recordings, leading to a higher level of audio fidelity.
- Repairing Damaged Audio: Audacity offers tools for repairing audio damage, including issues caused by glitches, distortions, or other imperfections. These tools can help restore the clarity and integrity of the audio, which is crucial for maintaining the listener’s enjoyment of the podcast.
- Improving Audio Clarity: Audacity’s restoration features can also help improve the clarity of audio that is not ideal, removing imperfections and enhancing the overall audio experience. These techniques can dramatically improve the clarity of the podcast, particularly if there are noticeable issues with the recording.
Advanced Audio Effects
Audacity provides a range of audio effects beyond basic adjustments. These effects can be used to create a unique sound for your podcast and enhance its production value.
- Equalization (EQ): EQ allows you to adjust the volume of different frequency ranges within the audio, which is useful for enhancing clarity and removing unwanted sounds. EQ is a valuable tool for shaping the overall tone of your podcast. Precise EQ adjustments can help to create a more balanced and pleasing sound for listeners.
- Reverb and Delay: These effects can add depth and ambience to the audio, creating a more immersive listening experience. Reverb and delay effects can help create a sense of space and dimension in the audio. Their use can help to enhance the listening experience, and their effects can be carefully modulated to produce various effects, like the echo of a live studio environment or a specific ambiance.
- Compression and Limiting: These effects help control the dynamic range of the audio, reducing the difference between loud and quiet parts. This makes the audio more consistent and easier to listen to. Compression and limiting are important for ensuring the podcast audio maintains a consistent listening experience.
Custom Audio Effects
Creating custom audio effects in Audacity can provide highly specific enhancements to your podcast. These effects are not readily available as pre-set options but can be achieved by combining and manipulating existing Audacity features.
- Combining Effects: Combining multiple effects can create complex and unique sounds for your podcast. This approach requires understanding how various effects interact and experimenting to achieve the desired outcome.
Integrating External Plugins
Integrating external audio plugins can expand Audacity’s functionality and provide even more advanced editing and sound design tools. This is a valuable tool to use to enhance podcast production.
- Plugin Installation and Configuration: Plugins typically require installation and configuration within Audacity, which usually involves placing them in the correct directory and configuring them according to the specific plugin instructions. Understanding the installation and configuration process is essential to successfully integrating the plugins into Audacity.
- Plugin Usage and Application: External plugins typically need to be activated within Audacity and used appropriately for the intended purpose. Understanding the plugin’s capabilities and parameters is crucial to achieving the desired effects.
Advanced Techniques for Unique Podcast Sound
Creating a unique podcast sound involves combining multiple techniques to establish a distinctive and consistent style. This is essential for building a recognizable brand identity for your podcast.
- Custom Sound Design: Custom sound design can create a specific atmosphere or mood, contributing to a distinctive podcast sound. Using custom sound design to enhance the listener’s experience is a useful technique.
- Sound Design for Branding: Designing a specific sound for your podcast can contribute to its branding and recognition by listeners. This approach requires understanding the target audience and tailoring the sound accordingly.
Table of Advanced Audio Effects
| Effect | Description | Practical Use in Podcast Editing |
|---|---|---|
| Noise Reduction | Reduces unwanted background noise. | Removes ambient sounds, traffic noise, or hum from recordings. |
| Audio Restoration | Improves audio quality by repairing damage. | Repairs recordings with distortion, glitches, or other imperfections. |
| EQ (Equalization) | Adjusts volume of different frequency ranges. | Highlights vocals, reduces background noise, and balances audio levels. |
| Reverb/Delay | Adds depth and ambience to the audio. | Creates a more immersive listening experience, simulates live studio environments. |
| Compression/Limiting | Controls dynamic range, reducing difference between loud and quiet parts. | Ensures consistent audio levels, prevents clipping, and enhances clarity. |
Wrap-Up
In conclusion, this guide has explored the various aspects of recording and editing podcasts with Audacity. By mastering the techniques discussed, you’ll be able to create high-quality podcasts with a professional sound. The detailed explanations and practical examples provide a solid foundation for anyone looking to enhance their podcasting skills. From basic recording to advanced editing and mixing, Audacity provides the tools you need to bring your podcast vision to life.


Post Comment