How To Overclock Your Gpu Safely
How to overclock your GPU safely is crucial for maximizing performance without damaging your hardware. This guide dives deep into the world of GPU overclocking, covering everything from fundamental concepts to advanced techniques. Understanding the potential benefits and risks, coupled with safe practices, is key to successful overclocking.
This comprehensive guide will equip you with the knowledge and tools to safely and effectively boost your GPU’s performance. We’ll explore various aspects, including the importance of monitoring, troubleshooting, and understanding the specific needs of different GPU models.
Introduction to Overclocking
Overclocking, in the context of GPUs, involves increasing the clock speed of the graphics processing unit (GPU) beyond its factory-specified limits. This pushes the hardware beyond its designed operating parameters, potentially enhancing performance but also introducing risks. Understanding the implications of overclocking is crucial for both maximizing performance and preventing damage.
Potential Benefits of GPU Overclocking
Boosting a GPU’s clock speed can lead to noticeable improvements in gaming performance, especially in demanding titles. Increased frame rates and smoother gameplay are common results. Additionally, overclocking can yield enhanced performance in other applications, like video editing and 3D rendering, by processing information faster.
Potential Risks of GPU Overclocking
Overclocking can stress the GPU’s components, potentially leading to instability, thermal throttling, and even permanent damage. Overheating is a primary concern, as increased clock speeds generate more heat, which can damage components if not properly managed. Improper overclocking can also lead to corrupted files, game crashes, and system instability. The potential for damage increases with the level of overclocking applied.
Importance of Safety Measures
Safe overclocking practices are essential to mitigate the risks associated with pushing hardware beyond its designed limits. Employing monitoring tools, using cooling solutions like aftermarket coolers, and maintaining careful control over voltage adjustments are vital safety precautions. Monitoring temperatures and ensuring adequate airflow within the PC chassis is equally important to prevent overheating.
Comparison of GPU Overclocking Methods
Different approaches to overclocking GPUs offer varying levels of control and complexity. The choice of method depends on the user’s technical expertise and desired level of control.
| Overclocking Method | Description | Level of Control | Complexity |
|---|---|---|---|
| Manual Overclocking | Directly adjusting clock speeds and voltages through specialized software. | High | High |
| Automatic Overclocking | Software automatically adjusts settings to optimize performance within predefined limits. | Low | Low |
| Hybrid Overclocking | Combining manual and automatic adjustments to maximize performance while retaining control. | Medium | Medium |
Manual overclocking provides the most control, enabling users to fine-tune settings precisely to achieve optimal performance. However, it requires a higher degree of technical knowledge and understanding of the system’s components. Automatic overclocking simplifies the process, but it often sacrifices the ability to precisely fine-tune settings. Hybrid overclocking offers a balance between control and ease of use.
Users with intermediate knowledge can employ this approach to achieve significant performance gains with a reduced risk of damage.
Understanding GPU Components
Understanding the inner workings of your GPU is crucial for safe and effective overclocking. Different components within the GPU contribute to its overall performance, and knowing how they interact is vital for achieving desired results without risking damage. This section delves into the core components influencing overclocking success.
Core Clock Speed
The core clock speed dictates the rate at which the GPU’s processing units, or cores, execute instructions. Higher core clock speeds generally translate to faster processing and better performance in tasks demanding significant calculations. A higher core clock speed allows the GPU to handle more tasks simultaneously. For instance, a game with complex physics simulations or a demanding video editing application will benefit from a higher core clock speed.
Overclocking the core clock speed directly affects the GPU’s computational capabilities.
Memory Clock Speed, How to overclock your GPU safely
GPU memory, often referred to as VRAM, stores the data the GPU processes. The memory clock speed determines how quickly the GPU can access and process this data. Faster memory clock speeds lead to quicker data retrieval and handling, boosting performance in tasks that rely heavily on VRAM access, such as high-resolution gaming and video editing. Increasing the memory clock speed improves the GPU’s ability to handle large datasets, ensuring smooth performance in demanding tasks.
Voltage
Voltage is the electrical potential difference applied to the GPU components. Increasing voltage often allows components to operate at higher frequencies. However, higher voltage is directly linked to increased power consumption and the risk of overheating or component damage. Voltage increases are crucial to consider when overclocking, as the optimal voltage for a specific overclock setting can vary.
Carefully monitoring the temperature and power consumption of the GPU during overclocking is essential to ensure safe operation.
Interaction of Components
Core clock speed, memory clock speed, and voltage are intricately linked. Increasing the core clock speed often necessitates a corresponding increase in voltage to ensure reliable operation. Similarly, boosting memory clock speed might also require a voltage adjustment. These adjustments are often interdependent, requiring careful consideration of their combined effects. Experimentation with different combinations is essential to determine the sweet spot that maximizes performance while maintaining stability.
Overclocking Stability Factors
Overclocking stability is crucial for preventing hardware damage and ensuring consistent performance. Several factors influence overclocking stability. Proper cooling solutions, including adequate fans and potentially specialized cooling systems, are paramount to prevent overheating. The quality of the power supply unit (PSU) can also impact stability. An insufficient PSU might not provide the necessary power to maintain stable operation during overclocking.
Finally, the motherboard’s stability and its interaction with the GPU need consideration.
Typical GPU Clock Speed Ranges
The following table illustrates typical core clock speeds and memory clock speeds for various GPU models. Keep in mind these are approximations and actual values can vary.
| GPU Model | Typical Core Clock Speed (MHz) | Typical Memory Clock Speed (MHz) |
|---|---|---|
| RTX 4090 | 2500-2700 | 21000-22000 |
| RTX 4080 | 2200-2400 | 19000-20000 |
| RTX 3090 | 1800-2000 | 18000-19000 |
| RTX 3080 | 1600-1800 | 16000-17000 |
Essential Tools and Software
Source: futurecdn.net
Choosing the right tools is crucial for safe and effective GPU overclocking. Without proper monitoring and control, you risk damaging your hardware. Effective tools allow you to precisely adjust settings and track performance in real-time, enabling you to identify potential issues and prevent overheating. This section details essential software for GPU monitoring and control.
Essential Monitoring Software
Selecting the right software for GPU monitoring and control is vital for safe overclocking. Different software packages offer varying features and capabilities, catering to diverse needs. Some focus on detailed performance metrics, while others provide more visual representations. The best choice depends on your comfort level and the specifics of your overclocking goals.
- GPU-Z: A popular and free tool for comprehensive GPU information. It provides details on the GPU’s specifications, current clock speeds, temperatures, and other crucial performance metrics. This detailed information is invaluable for understanding the base performance of your GPU before overclocking and for identifying any potential issues during the process.
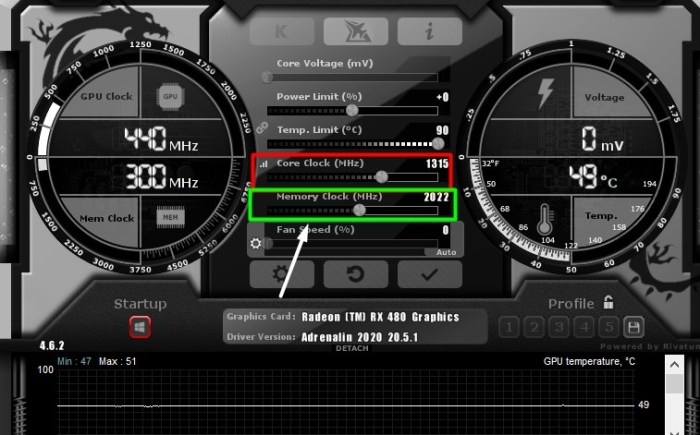
- MSI Afterburner: A widely used and highly configurable program known for its comprehensive monitoring and overclocking capabilities. It allows you to adjust clock speeds, voltages, and fan curves, enabling you to fine-tune your GPU’s performance. Its real-time monitoring capabilities allow you to observe the GPU’s temperature and other critical parameters, enabling proactive adjustments.
- HWMonitor: A versatile hardware monitoring tool providing detailed information about the components within your system, including the GPU. It displays a wide range of data, such as temperatures, voltages, and fan speeds, which are essential for maintaining stable performance and preventing thermal issues during overclocking. It provides valuable insight into the overall system health, beyond just the GPU.
- Core Temp: A specialized tool specifically designed for monitoring CPU temperatures. While not directly related to GPU overclocking, it’s crucial for ensuring the stability of the entire system, as CPU and GPU temperatures often influence each other. Understanding both CPU and GPU temperatures is important for a stable system.
Benefits of Using Monitoring Tools
Utilizing monitoring software offers several advantages. Accurate and real-time monitoring allows you to assess the impact of your overclocking decisions on GPU performance. This real-time feedback allows for proactive adjustments to prevent potential instability or overheating. This proactive approach can greatly improve the safety and success of your overclocking endeavors. By closely monitoring various metrics, you can avoid critical issues like sudden crashes or irreversible hardware damage.
Choosing the Right Software
The choice of software depends on your specific needs and goals. For basic monitoring, a tool like GPU-Z is sufficient. For more in-depth control and overclocking, MSI Afterburner or similar programs are recommended. The specific features of each tool should be carefully considered to ensure they meet your specific requirements.
Key Features of Popular GPU Overclocking Software
The table below Artikels the key features of some popular GPU overclocking software. This information allows you to compare the capabilities of different programs and select the best fit for your needs.
| Software | Key Features | Pros | Cons |
|---|---|---|---|
| GPU-Z | Comprehensive GPU information, detailed metrics, real-time monitoring. | Free, provides comprehensive overview, good for basic monitoring. | Limited overclocking capabilities. |
| MSI Afterburner | Extensive overclocking options, real-time monitoring, customizable profiles. | Powerful overclocking features, detailed monitoring, customizable. | Can be more complex to learn compared to simpler tools. |
| HWMonitor | Detailed system monitoring, including temperatures and voltages for all components. | Provides a broad view of system health, essential for troubleshooting. | Not specifically designed for overclocking, focuses on monitoring. |
| Core Temp | Specialized CPU temperature monitoring. | Crucial for maintaining overall system stability, identifies potential CPU bottlenecks. | Limited to CPU temperature monitoring, doesn’t directly control GPU. |
Safe Overclocking Procedures
Safe overclocking is crucial for maximizing GPU performance while minimizing the risk of damage. A methodical approach, focusing on gradual adjustments and careful monitoring, is paramount to achieving optimal results without jeopardizing the longevity of your hardware. Understanding the limits of your specific GPU model and adhering to safe practices are essential for successful overclocking.
Step-by-Step Procedure for Safe GPU Overclocking
A structured approach to overclocking ensures that you are gradually pushing the boundaries of your GPU’s capabilities while maintaining stability. This methodical approach involves careful monitoring of various parameters and adjustments to avoid damaging the hardware. Starting with minimal adjustments allows you to assess the system’s reaction and stability.
- Initial Assessment: Thoroughly examine your GPU’s specifications and identify the maximum recommended clock speeds for your model. This crucial step helps establish a baseline for safe overclocking. Research and identify any specific limitations or warnings related to your particular GPU model.
- Gradual Adjustments: Begin by making small, incremental adjustments to the core clock, memory clock, and voltage. Monitor the system’s stability during each increment. Observe for any signs of instability, such as system crashes, artifacts, or unusual temperatures. Record the changes made and the system’s response.
- Rigorous Testing: Implement stress tests to evaluate the stability of your overclocked system. Use tools specifically designed for GPU stress testing, such as FurMark or Unigine Superposition. These tests subject the GPU to demanding workloads, exposing potential instability issues.
- Voltage Adjustments: Carefully monitor and adjust the voltage applied to the GPU. Voltage adjustments should always be gradual and measured to maintain system stability. Excessive voltage can lead to overheating and damage. Start with small increments and record the effects.
- Monitoring System Temperatures: Continuously monitor the GPU’s temperature during stress testing. Excessive temperatures can lead to performance degradation or irreversible damage. Use dedicated monitoring tools to track temperatures and ensure they remain within safe operating ranges.
- Record Your Results: Keep a detailed log of your overclocking adjustments, including the applied voltage, core clock speed, and memory clock speed, along with the results of the stability tests. This detailed record will help you reproduce the overclocking settings and optimize future adjustments.
Safe Overclocking Increments
Overclocking increments should be small and measured to prevent instability and damage. Start with small increments, typically 5-10 MHz for the core clock and 50-100 MHz for the memory clock. Monitoring for instability is key. Gradually increase the increments as you observe the system’s response.
- Core Clock: Starting with increments of 5-10 MHz, observe the system’s stability and gradually increase the increments as the system performs reliably.
- Memory Clock: Begin with increments of 50-100 MHz for the memory clock, gradually increasing them as the system displays stability.
Importance of Gradual Adjustments
Gradual adjustments are essential to avoid sudden spikes in voltage, temperature, or system instability. This method allows you to identify the precise limits of your GPU without causing irreversible damage.
Recommended Voltage Increments
The following table provides a general guideline for recommended voltage increments based on various GPU models. These values are intended as a starting point and should be adjusted based on individual GPU characteristics and performance observations.
| GPU Model | Recommended Voltage Increment (mV) |
|---|---|
| NVIDIA RTX 4090 | 5-10 mV |
| NVIDIA RTX 4080 | 5-10 mV |
| NVIDIA RTX 3090 | 5-10 mV |
| AMD RX 7900 XTX | 5-10 mV |
| AMD RX 6900 XT | 5-10 mV |
Monitoring and Troubleshooting
Overclocking a GPU, while potentially rewarding, requires careful monitoring and proactive troubleshooting. Continuous vigilance is crucial to prevent damage and ensure stability. Understanding potential issues and knowing how to address them promptly is vital for a successful overclocking endeavor.
Importance of Continuous Monitoring
Continuous monitoring of GPU temperature and stability is paramount during overclocking. Unmonitored increases in temperature can lead to thermal throttling, performance degradation, and ultimately, damage to the GPU. Stability issues can manifest in various ways, from erratic frame rates to complete system crashes. A proactive approach, involving regular checks and responses to emerging problems, significantly minimizes the risk of hardware failure.
Common Signs of Overclocking Problems
Several indicators can signal potential problems during overclocking. Early detection is key to preventing further issues.
- Erratic Frame Rates: Fluctuations in frame rates, from significant drops to sudden spikes, can be a symptom of instability. These fluctuations may not always be correlated with a particular action or event.
- System Crashes: Unexpected system crashes, especially during intensive tasks, are a serious warning sign. These crashes can be caused by thermal throttling, or other stability issues.
- Blue Screen of Death (BSOD): A BSOD, or similar error message, indicates a severe problem that often requires immediate intervention and possibly system diagnostics.
- High GPU Temperatures: Excessive GPU temperatures, especially sustained high temperatures, can lead to thermal throttling. Monitoring tools provide crucial insights into the GPU’s thermal profile.
- Fan Issues: A fan that isn’t spinning or is not performing its function adequately can indicate a thermal management problem. A fan may not spin at full speed due to the GPU overheating.
Identifying and Resolving Problems
Troubleshooting overclocking issues involves a methodical approach. Initially, review the overclocking settings and identify potential conflicts or overly aggressive settings. Consider reverting to previous stable configurations if possible.
- Monitoring Tools: Utilizing dedicated monitoring software, such as MSI Afterburner, provides valuable data about GPU temperature, clock speeds, and other critical metrics. These tools allow for a real-time view of performance during overclocking.
- Cooling System Checks: Ensure adequate airflow and proper cooling of the GPU. If necessary, adjust the cooling system or consider a more robust cooling solution.
- Overclocking Settings Adjustment: Carefully review the overclocking settings. Adjusting the voltage, core clock, or memory clock to a lower setting may restore stability.
- System Stability Checks: Run stress tests, like FurMark or Heaven Benchmark, to simulate demanding tasks and evaluate the system’s stability under load. This helps identify potential instability that might not be apparent in everyday use.
Potential Error Codes and Solutions
A table outlining potential error codes and their corresponding solutions can be highly beneficial.
| Error Code | Description | Solution |
|---|---|---|
| Overclocking Failure | GPU fails to maintain stability at the overclocked settings. | Reduce the overclocking settings, adjust voltage, or try a different cooling solution. |
| Thermal Throttling | GPU is overheating and reducing its clock speed to prevent damage. | Increase cooling, adjust overclocking settings, or ensure proper airflow. |
| Memory Instability | GPU memory exhibits erratic behavior. | Reduce the overclocking settings for the memory clock, check for memory conflicts, or re-seat the memory modules. |
| Fan Malfunction | The GPU fan isn’t functioning correctly. | Check fan speed, ensure the fan is properly connected, or replace the fan if necessary. |
Hardware Considerations
Choosing the right cooling solution is critical for stable and effective GPU overclocking. A poorly designed or underpowered cooling system can lead to thermal throttling, instability, and even permanent damage to your GPU. Understanding the relationship between cooling and overclocking is paramount to successful and safe performance enhancement.Effective cooling directly impacts the stability and performance of overclocked GPUs.
Higher clock speeds generate more heat, and if the cooling solution cannot adequately dissipate this heat, the GPU will experience thermal throttling, where it automatically reduces its clock speed to prevent damage. This throttling significantly impacts performance, rendering the overclocking efforts largely ineffective. Furthermore, sustained thermal stress can lead to component degradation and potentially shorten the lifespan of your GPU.
Impact of Cooling Solutions on GPU Overclocking Stability
Adequate cooling is essential to maintain a stable operating temperature during overclocking. A good cooling solution helps prevent thermal throttling, ensuring that the GPU can sustain the higher clock speeds. By effectively dissipating the heat generated, the cooling system allows the GPU to operate at its maximum potential, leading to improved performance. The choice of cooling solution should be carefully considered, taking into account factors such as the GPU’s thermal design power (TDP) and the expected overclocking level.
Importance of Choosing Appropriate Cooling Solutions for Effective Overclocking
Selecting a cooling solution that matches the expected overclocking level is crucial. A cooling solution that is too weak will struggle to keep the GPU cool at higher clock speeds, leading to thermal throttling and instability. Conversely, an excessively powerful solution is unnecessary and may even add to the cost. The optimal choice balances cooling efficiency with cost-effectiveness.
Comparison of Different Cooling Solutions and their Impact on Overclocking Performance
Various cooling solutions are available, each with its strengths and weaknesses. The most common types include air cooling and liquid cooling. Air cooling solutions, such as high-performance fans, are generally more affordable, while liquid cooling systems, often using water or other fluids, can provide more substantial cooling capacity. However, liquid cooling systems often require more complex setup and maintenance.
Cooling Performance Comparison Table
| Cooling Solution | Cooling Performance (Estimated) | Pros | Cons |
|---|---|---|---|
| High-Performance Fans (with optimized mounting) | Good for moderate overclocks | Affordable, relatively easy to install | Can struggle with extreme overclocks, prone to noise |
| Custom Water Cooling Loops | Excellent for extreme overclocks | Superior cooling, low noise (with properly chosen components) | Complex setup, higher cost, more maintenance |
| Pre-built AIO (All-in-One) Water Cooling | Good for moderate to high overclocks | Relatively easy to install, lower maintenance compared to custom loops | Higher cost than high-performance fans, may not offer the same extreme cooling as custom loops |
Choosing the right cooling solution involves a careful balance of performance, cost, and ease of installation.
Advanced Overclocking Techniques: How To Overclock Your GPU Safely
Pushing your GPU’s performance beyond its default settings requires a deeper understanding of its components and careful consideration of potential risks. Advanced techniques involve fine-tuning various parameters to extract the maximum possible performance while maintaining stability. This section delves into specific methods and strategies for achieving optimal overclocking results.Advanced overclocking often goes beyond simply adjusting core clock speeds. It involves a nuanced approach, considering various interactions between components and exploring different avenues for performance gains.
This meticulous process requires patience and a thorough understanding of the interplay between voltage, memory frequency, and other crucial settings.
Advanced Techniques for Higher Overclocking Results
Optimizing overclocking involves exploring different approaches beyond basic core and memory clock adjustments. This includes techniques that target specific components or utilize specialized software features. Exploring these advanced methods can unlock significant performance gains, but it’s crucial to proceed with caution and monitor system stability.
- Fine-tuning voltage curves: Adjusting voltage curves dynamically based on load and temperature can significantly improve stability without sacrificing performance. This allows the GPU to draw the precise amount of voltage needed at any given time, minimizing wasted energy and heat generation. This technique often yields more stable overclocks compared to fixed voltage settings.
- Utilizing custom BIOS settings: Some motherboards and GPUs allow users to access advanced BIOS settings. These settings may provide opportunities to fine-tune power delivery, voltage control, and other aspects of the system’s behavior. Carefully studying the BIOS documentation is essential to ensure proper usage and avoid potential damage.
- Employing software-based tools: Dedicated overclocking software often includes advanced features such as dynamic voltage scaling, temperature monitoring, and stress testing. These tools can provide detailed information about the GPU’s performance under various conditions, allowing users to adjust settings accordingly for optimal results.
Identifying Optimal Overclocking Settings for a Specific GPU
Finding the optimal overclocking settings for a particular GPU is a process that involves experimentation, monitoring, and a degree of trial and error. There’s no one-size-fits-all solution. A comprehensive understanding of the GPU’s capabilities and limitations is crucial.
- Benchmarking: Running various benchmarks under different load conditions provides a baseline for evaluating performance gains and stability. This allows comparison of overclocked results against default settings, ensuring that performance improvements outweigh potential stability issues.
- Iterative adjustments: Gradually increasing clock speeds and voltages, while meticulously monitoring system stability, is essential. This approach minimizes the risk of instability and helps identify the exact threshold where performance gains are maximal and stability is maintained.
- Monitoring temperature and power consumption: A stable overclock must consider temperature and power consumption. Monitoring these factors throughout the overclocking process is essential to prevent overheating or excessive power draw, which can lead to component failure.
Summary Table of Advanced Overclocking Techniques
| Technique | Description | Potential Risks |
|---|---|---|
| Fine-tuning voltage curves | Dynamically adjusting voltage based on load and temperature | Potential for instability if not implemented carefully |
| Utilizing custom BIOS settings | Adjusting power delivery, voltage control, and other system parameters | Improper BIOS modification can cause system instability or damage |
| Employing software-based tools | Using software features for dynamic voltage scaling, monitoring, and stress testing | Incorrect usage of software features can lead to system instability |
Specific GPU Overclocking Strategies
Overclocking strategies aren’t a one-size-fits-all solution. Different GPU architectures and models react differently to various overclocking techniques. Understanding these nuances is crucial for achieving optimal performance gains without risking damage. A well-defined strategy, tailored to the specific GPU, is essential for safe and effective overclocking.Choosing the right overclocking approach for a particular GPU involves careful consideration of its architecture, specific features, and thermal capabilities.
For example, some GPUs might be more responsive to core clock increases, while others might benefit more from memory clock adjustments. This tailored approach maximizes potential while minimizing the risk of instability.
Identifying the Optimal Approach
Determining the most effective overclocking strategy involves several key steps. First, thoroughly research the target GPU model, focusing on its specifications and known limitations. Examine benchmark results and user reviews for insight into the typical performance characteristics and limitations of the specific GPU. This research should help identify potential bottlenecks and weaknesses. Secondly, analyze the hardware configuration, considering the cooling solution, power supply, and other components that might affect overclocking stability and performance.
This holistic approach ensures a strategy that aligns with the overall system’s capabilities.
Overclocking Strategies for Different GPU Models
Different GPU architectures and models respond differently to overclocking techniques. A strategy effective for one model might prove ineffective or even damaging for another. This necessitates an approach tailored to the specific characteristics of each GPU.
- Nvidia GeForce RTX 40 Series: These GPUs often benefit from a combination of core and memory overclocking. However, careful attention to voltage adjustments is crucial, as these GPUs are sensitive to voltage fluctuations. Starting with moderate increases and monitoring the system closely is recommended. Overclocking memory independently is often worthwhile to maximize bandwidth. For example, a 4090 with a 2.5 GHz core clock and 1.8 GHz memory clock may be successfully overclocked to 2.8 GHz and 2.0 GHz respectively with appropriate voltage adjustments.
Be prepared to make small adjustments based on monitoring and benchmark results.
- AMD Radeon RX 7000 Series: These GPUs often exhibit excellent performance with a focus on core clock increases. Memory overclocking can be beneficial, but the interaction between core and memory clocks may need careful calibration. For example, an RX 7900 XTX with a 2.5 GHz core clock and 1.7 GHz memory clock might benefit from a core increase to 2.7 GHz and a memory adjustment to 1.9 GHz.
The crucial step is to closely monitor the system’s stability and performance after each adjustment.
- Older GPU Models: Strategies for older GPU models often prioritize core clock adjustments. Memory overclocking might be less effective or even destabilizing. For example, a GTX 1080 might benefit from a core clock increase to 1.8 GHz and a more conservative memory adjustment, but this is heavily model dependent.
Effectiveness Comparison
The effectiveness of different overclocking strategies varies significantly based on the hardware configuration. For example, a high-end GPU with a robust cooling system and a powerful power supply might handle more aggressive overclocking than a lower-end GPU with limited cooling and power delivery. This highlights the importance of considering the overall system when implementing a specific overclocking strategy.
| GPU Model | Overclocking Strategy | Effectiveness | Hardware Considerations |
|---|---|---|---|
| Nvidia GeForce RTX 4090 | Core and memory overclocking with voltage adjustments | High | Robust cooling, high-quality power supply |
| AMD Radeon RX 7900 XTX | Core clock increase with memory adjustments | High | Effective cooling solution, adequate power delivery |
| Nvidia GeForce RTX 3080 | Core clock increase with conservative memory adjustments | Moderate | Sufficient cooling, power supply |
Preventing Overheating and Damage
Overclocking a GPU can significantly boost performance, but it also introduces the risk of overheating. Understanding the causes and implementing preventative measures is crucial for maintaining the longevity and stability of your graphics card. Proper cooling solutions and careful monitoring are key to a successful and safe overclocking experience.GPU overheating during overclocking stems from a delicate balance between the generated heat and the cooling capacity of the system.
Increased clock speeds lead to higher power consumption and, consequently, more heat. If the cooling system can’t effectively dissipate this heat, temperatures rise, potentially damaging the GPU.
Causes of GPU Overheating
Insufficient cooling solutions are a primary contributor to GPU overheating. This includes inadequate fans, poor thermal paste application, or obstructed airflow within the case. Additionally, high ambient temperatures in the environment and a poorly designed or obstructed heatsink can further exacerbate the issue.
Effective Strategies to Prevent Overheating
Proper cooling solutions are vital. Ensure adequate airflow within your computer case. Use high-quality thermal paste for optimal heat transfer between the GPU and its heatsink. A high-quality, well-designed heatsink can play a significant role in preventing overheating. Using case fans, or even adding additional fans, to improve airflow is also an effective strategy.
Identifying Signs of Overheating
Recognizing the signs of overheating is crucial for preventing damage. Unusual noises like a whining or screeching sound from the fans or unusual smells (burnt plastic or electrical components) can indicate overheating. Monitoring software provides real-time temperature readings, enabling you to promptly identify escalating temperatures. Unexpected shutdowns or performance drops, especially during demanding tasks, can also signal a potential overheating problem.
A significant drop in FPS (frames per second) in games, or other applications, can indicate a GPU is struggling to maintain optimal performance due to heat.
Preventive Measures Against GPU Overheating
| Preventive Measure | Description |
|---|---|
| Proper Thermal Paste Application | Applying a thin, even layer of thermal paste between the GPU and heatsink is crucial for optimal heat transfer. Excessive paste can hinder performance and lead to poor heat dissipation. |
| Sufficient Cooling Solutions | Ensure sufficient airflow within the computer case. Using high-quality fans and ensuring adequate space for heat dissipation is essential. |
| Monitoring Software | Use monitoring software to track GPU temperatures in real-time. Setting alerts for critical temperature thresholds can help prevent damage. |
| Regular Maintenance | Regularly clean your fans and heatsink to remove dust and debris that can impede airflow. |
| Ambient Temperature Control | Maintain a cool environment within the computer case. Reduce ambient temperature in the room. |
| Case Design | A well-designed computer case with sufficient airflow can help prevent overheating. |
Understanding Voltage Adjustments
Source: appuals.com
Voltage adjustments play a crucial role in GPU overclocking. Precisely controlling voltage allows you to push your GPU beyond its stock limits, potentially unlocking higher clock speeds and performance. However, incorrect voltage adjustments can lead to instability, damage, or even complete failure of the hardware. Understanding the relationship between voltage and performance, along with safe adjustment procedures, is essential for successful and safe overclocking.Voltage, in the context of overclocking, is the electrical potential difference applied to the GPU’s components.
Higher voltage generally allows for higher clock speeds, but this comes with risks. The amount of voltage increase necessary to achieve a specific performance gain varies greatly depending on the specific GPU model, its design, and the components within it. Understanding these variables is key to safe and effective overclocking.
Relationship Between Voltage and Performance
Increasing the voltage supplied to the GPU’s components allows them to operate at higher frequencies. This increase in frequency directly translates to increased performance. However, the relationship is not linear. A small increase in voltage can result in a significant performance boost, but beyond a certain point, further voltage increases might yield diminishing returns or even lead to instability.
Overclockers often use a trial-and-error approach, carefully monitoring performance metrics to identify the optimal voltage for their specific needs.
Examples of Voltage Adjustments for Various GPU Models
GPU manufacturers don’t typically publish precise voltage adjustment ranges for overclocking. However, general guidelines and benchmarks from experienced overclockers can provide valuable insights. For example, a mid-range GeForce RTX 3060 Ti might benefit from a voltage adjustment in the range of 0.025 to 0.050 volts, while a high-end RTX 4090 might require more careful adjustments, possibly in the range of 0.050 to 0.100 volts.
These figures are approximate and should be used as starting points for testing.
Importance of Understanding Voltage Tolerances for Different Components
Voltage tolerances vary significantly across different GPU components. The voltage regulation circuits and capacitors within the GPU are designed to operate within specific ranges. Exceeding these tolerances can lead to overheating, component failure, and even fire hazards. It’s critical to understand the specific voltage tolerances for each component within the GPU to avoid exceeding safe limits.
Comparison of Voltage Adjustments for Different Overclocking Methods
| Overclocking Method | Typical Voltage Adjustment Range (Example) | Risk Factors |
|---|---|---|
| Core Clock Increase | 0.025V to 0.050V | Instability, overheating |
| Memory Clock Increase | 0.010V to 0.030V | Instability, memory errors |
| Mixed Clock Increase | 0.020V to 0.070V | Instability, component damage |
This table provides a simplified overview. The actual voltage adjustment range will depend heavily on the specific GPU model, cooling solution, and other hardware configurations.
Ultimate Conclusion
In conclusion, safe GPU overclocking involves a careful balance of pushing performance and protecting your hardware. By understanding the fundamentals, using the right tools, and following safe procedures, you can significantly enhance your gaming or creative experiences without jeopardizing your investment. Remember, gradual adjustments, constant monitoring, and a deep understanding of your specific GPU are paramount for a positive outcome.


Post Comment