How To Make Weather App Javascript
How to make weather app JavaScript? This guide provides a comprehensive walkthrough for building a functional weather application using JavaScript. We’ll cover everything from setting up the project to fetching data, displaying information, and handling user interactions.
Learn how to create a weather app that fetches real-time data from an API, displays it in a user-friendly format, and provides a seamless user experience. We’ll explore different aspects of web development, including HTML, CSS, and JavaScript, to build a robust and responsive application.
Project Setup and Structure
A well-structured project is crucial for a maintainable and scalable weather application. This section Artikels the essential elements for a project directory, file organization, dependency management, and API key setup.A well-organized structure streamlines development and enhances code readability, which directly impacts the overall quality and maintainability of the application. This includes the clear separation of concerns and efficient management of project resources.
Project Directory Structure
A structured project directory enhances code organization and readability. A recommended structure is as follows:
- weather-app
- index.html
- style.css
- script.js
- data/
- weather_data.json
- package.json (or yarn.lock)
This structure separates HTML for presentation, CSS for styling, JavaScript for logic, and data for storing weather information. The `package.json` or `yarn.lock` file will be used to manage dependencies.
File Structure Details
The `index.html` file serves as the entry point, defining the structure for displaying weather data. The `style.css` file contains the styling rules for visual presentation. The `script.js` file holds the JavaScript code for handling data fetching, processing, and displaying weather information. The `data` folder stores any weather data used in the application. The `weather_data.json` file, for example, could store pre-loaded weather data for offline access.
Dependency Management
Effective dependency management is crucial for managing external libraries.
- npm (Node Package Manager): npm is a package manager for JavaScript that allows you to install and manage external packages and dependencies. It uses a `package.json` file to define the project’s dependencies. The `package.json` file also contains information about the project, including its name, version, dependencies, and scripts.
- yarn (Yarn Package Manager): yarn is another package manager for JavaScript. It offers better performance and features compared to npm, especially for large projects. Similar to npm, yarn manages dependencies using a `package.json` file.
Basic HTML Template
The `index.html` file provides a basic structure for displaying weather information. It typically includes elements for displaying the city, temperature, description, and other relevant details.“`html
Temperature: °C
Description:
“`
JavaScript Function Organization
JavaScript functions should be organized logically for different functionalities. For instance, a function for fetching weather data, another for processing the data, and another for updating the display.“`javascriptfunction fetchData(city) // Code to fetch weather data from API using cityfunction processData(data) // Code to extract temperature and descriptionfunction updateDisplay(data) // Code to update HTML elements with data“`
API Key Setup
Setting up API keys for weather data is necessary for accessing external weather APIs.
- Obtain API Key: Register for an account with a weather API provider (e.g., OpenWeatherMap, WeatherAPI). Obtain the required API key from the provider’s dashboard.
- Store API Key Securely: Store the API key securely, preferably in an environment variable, rather than hardcoding it directly into the code.
- Example (Illustrative): A weather API key would be used in the `fetchData` function to make requests to the API.
Data Fetching and Handling
Fetching weather data from an API like OpenWeatherMap is crucial for a functional weather application. This process involves making requests to the API endpoint, receiving a JSON response, and parsing that data into usable JavaScript objects. Robust error handling is essential to ensure the application’s stability and resilience to API issues. Proper caching of data can significantly improve performance, especially for frequently accessed information.The structure of the OpenWeatherMap JSON response is standardized and provides comprehensive weather details.
Parsing this data involves extracting relevant information and storing it in a format suitable for display in the application. This structured approach allows for efficient data manipulation and presentation.
Fetching Weather Data from an API
To retrieve weather data, use the `fetch` API in JavaScript. This method allows asynchronous communication with the API endpoint. An example request to OpenWeatherMap might look like this:“`javascriptfetch(‘https://api.openweathermap.org/data/2.5/weather?q=London,uk&appid=YOUR_API_KEY&units=metric’) .then(response => response.json()) .then(data => // Handle the data here console.log(data); ) .catch(error => console.error(‘Error fetching data:’, error); // Display error message to the user );“`This code fetches weather data for London, using the `metric` unit system.
Remember to replace `YOUR_API_KEY` with your actual OpenWeatherMap API key.
JSON Response Structure
The JSON response from the OpenWeatherMap API contains various properties, including the city name, temperature, humidity, and weather conditions. A sample response might look like this (simplified):“`json “name”: “London”, “main”: “temp”: 15.5, “humidity”: 80 , “weather”: [ “description”: “light rain” ], “wind”: “speed”: 10 “`
Parsing JSON Data
Parsing the JSON response into usable JavaScript objects is straightforward. JavaScript’s built-in `JSON.parse()` method efficiently converts the JSON string into a JavaScript object.“`javascriptconst data = JSON.parse(response.json());const temperature = data.main.temp;const humidity = data.main.humidity;const weatherDescription = data.weather[0].description;“`This example demonstrates how to extract specific data points from the parsed JSON object.
Error Handling
Robust error handling is essential when making API calls. Use `.catch` blocks to handle potential errors during the `fetch` process. Displaying user-friendly error messages improves the user experience.
Handling Different Data Formats
The OpenWeatherMap API can return data in various formats, including `metric` and `imperial`. The application should be adaptable to handle these different data formats.
Caching Weather Data
Caching weather data can improve application performance by reducing the number of API requests. Implement a caching mechanism to store recently fetched data and retrieve it from the cache when possible. This strategy can significantly reduce latency and improve responsiveness.
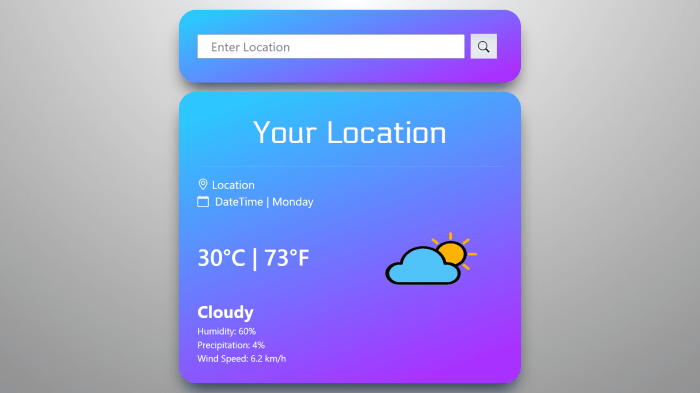
Displaying Weather Information: How To Make Weather App JavaScript
Source: bytewebster.com
Presenting weather data in a clear and user-friendly format is crucial for a successful weather application. A well-designed display ensures users can quickly grasp essential information like current conditions, forecasts, and relevant details. This section details the design considerations for displaying weather data effectively.Responsive layouts are essential for modern applications. A responsive design adjusts the display to various screen sizes, ensuring a positive user experience across different devices, from mobile phones to large desktop monitors.
A flexible grid system or media queries are commonly used to achieve this.
Responsive Layout Design
Employing a responsive layout is critical for a positive user experience across various devices. This approach uses flexible grid systems or media queries to adapt the display to different screen sizes, making the interface usable on phones, tablets, and desktops. For example, a detailed weather display on a desktop might condense to a more concise view on a mobile device, while retaining key information.
Table for Weather Data Display
A table structure is a suitable format for presenting weather data. This structure allows for clear organization of information, making it easy for users to compare various details.
| Parameter | Value |
|---|---|
| Temperature | 25°C |
| Description | Partly Cloudy |
| Humidity | 60% |
| Wind Speed | 15 km/h |
This table clearly displays essential weather data in a structured format. Different data points are easily comparable, allowing for quick analysis.
Formatting Date and Time
Various date and time formats can be implemented to suit user preferences. A user interface allowing selection between different formats, such as long date, short date, or time zones, would be beneficial. The default setting could be based on the user’s location.
Handling Units of Measurement
The application should support different units of measurement, such as Celsius and Fahrenheit, for temperature. A user-configurable setting allows users to choose their preferred units. A switch between Celsius and Fahrenheit would provide a customized user experience.
Displaying Weather Icons
Using weather icons enhances the visual appeal and understanding of weather conditions. These icons visually represent different weather types, such as rain, snow, or sun. The icons should be high-quality and easily distinguishable, enhancing user comprehension.
Organizing Forecast Information
Organizing forecast information in sections, such as hourly or daily forecasts, is a useful feature. A clear display of future weather conditions, with easily discernible time periods, allows users to plan accordingly. Hourly forecasts can provide a detailed view of the weather throughout the day, whereas daily forecasts offer a summary of the weather conditions for a particular day.
These different sections allow for easier comprehension of the forecast information.
User Interface (UI) Interactions
Implementing interactive elements enhances the user experience of a weather application. Users expect to easily input location data and receive relevant, up-to-date information. This section details crucial aspects of creating a user-friendly interface for your weather application.
Search Functionality
Search functionality is essential for allowing users to input specific locations for weather data retrieval. A search bar, typically a text input field, is a common way to achieve this. Users can type the name of a city, region, or zip code into the search bar. The application should provide real-time suggestions based on the input, potentially drawing from a pre-populated database of locations.
Consider incorporating auto-completion for improved usability. This feature can be implemented by using JavaScript’s `input` event listener for the search bar.
User Input Handling
User input, particularly city names, requires robust handling. The input should be validated to ensure it matches expected formats and that the inputted location is valid. If the input is invalid, the application should provide appropriate feedback to the user, such as an error message or a suggestion for a valid location. This error handling should prevent crashes and improve the user experience.
The application should use a function to check the validity of the input and handle cases like typos or missing input.
Updating the UI with Fetched Data
Updating the UI with fetched weather data is a critical component of the application. Dynamically updating elements based on the fetched weather data is crucial for real-time information. Methods for achieving this include using JavaScript’s `innerHTML` or DOM manipulation to modify elements within the webpage. For example, a `city` element can be updated to reflect the city the user searched for.
This approach should be concise and well-organized to maintain a clean and efficient display. This dynamic updating maintains a responsive and informative user interface.
Updating Display Based on User Input
The display must update promptly and accurately when the user provides input. Upon receiving user input (e.g., city name), the application should initiate a fetch request for the corresponding weather data. The fetched data should then be used to update the UI elements that display weather information. A clear example would be updating the temperature display, wind speed, or precipitation information when a new location is entered.
This method ensures that the weather information is correctly reflected in response to user actions.
Displaying Multiple Days of Forecast
Displaying multiple days of weather forecast requires a structured approach to present the information clearly. A tabular format, such as a table with rows representing each day and columns for temperature, precipitation, and other relevant data, can effectively convey the forecast. Using an ordered list (
- ) to present each day’s forecast could also be effective, or a horizontal scrolling section could also work well. The presentation should be easily understandable, avoiding clutter. Using a responsive design is essential to ensure optimal viewing on various screen sizes.
- Media Queries: CSS media queries allow you to apply different styles based on screen width, height, orientation (portrait or landscape), and other factors. This enables the app to adjust its layout and presentation for optimal viewing on various devices. For example, a wider layout might be suitable for desktops, while a more compact layout is preferable for smaller screens.
- Fluid Grids and Layouts: Using relative units like percentages and ems for sizing elements ensures that the layout scales proportionally with the screen size. Avoid fixed pixel values as they lead to layout issues on different devices. This flexibility is key to adapting to different resolutions and orientations without disrupting the user experience.
- Flexible Images: Use the `max-width: 100%;` property for images to prevent them from overflowing their containers. This maintains a good visual experience while ensuring that the image size adjusts appropriately to the screen size, preventing stretching or cropping.
- Color Contrast: Ensuring sufficient color contrast between text and background is crucial for users with visual impairments. Adhering to accessibility guidelines like WCAG (Web Content Accessibility Guidelines) is vital. Tools can assist in evaluating color contrast and help ensure compliance.
- Alternative Text (Alt Text): Providing descriptive alt text for all images and interactive elements helps screen reader users understand the content. This is essential for providing a textual representation of the visual elements. For example, an image of a partly cloudy sky might have alt text like “Partly cloudy sky.”
- Keyboard Navigation: Design the app so that all interactive elements are accessible via keyboard. Ensure all interactive elements, like buttons and links, can be activated and controlled using the keyboard alone.
- Viewport Meta Tag: The ` ` meta tag is essential to adjust the layout for different screen sizes and mobile devices. It ensures that the webpage scales appropriately to fit the viewport, preventing the content from appearing too small or large.
- Mobile-First Approach: Start designing for mobile devices first, and then progressively enhance the layout for larger screens. This ensures a good experience on smaller screens, which is crucial for a weather app, as many users access it through mobile devices.
- Touch Interactions: Design interactive elements to be appropriately sized for touch input on mobile devices. Buttons and other interactive components should be large enough to easily tap with a finger.
Handling User Interaction with Weather Data
Handling user interaction with the weather data involves providing mechanisms for users to interact with the displayed information. For instance, the user could click on a specific day’s forecast to view detailed information. This could involve opening a modal window or dynamically updating the content within a designated section of the application. This approach would provide users with the necessary context for the weather forecast.
Advanced Features (Optional)
Enhancing your weather app with advanced features can significantly improve its usability and appeal. These features, while optional, can provide users with more comprehensive and interactive experiences. Consider these options to make your app truly stand out.
Weather Map Display
Integrating a weather map is a powerful way to visualize weather patterns. A map displaying current weather conditions, such as temperature, precipitation, and wind speed, can provide a holistic view of the area. This visual representation enhances user understanding of the broader weather context. Using readily available map APIs (like Leaflet or OpenWeatherMap) allows for seamless integration with your existing code.
These APIs provide map tiles and data overlays. The map can be centered on the location being displayed. The user interface could also allow users to zoom and pan across the map for a more detailed view of the weather in the surrounding area.
Location Comparison
Comparing weather data across multiple locations is a valuable feature. Allowing users to select two or more locations and compare their current weather conditions can provide a clear view of the differences. For example, a user could compare the temperature in New York City with the temperature in Los Angeles. This feature requires the app to handle multiple data fetches and provide a clear comparison table or chart.
The display could highlight differences in temperature, precipitation, humidity, and wind speed.
Unit Conversion
Implementing a unit conversion feature can make your app more user-friendly. Users may prefer different units for temperature (Celsius, Fahrenheit), distance, or speed. This feature requires a simple conversion logic that can be applied to the retrieved weather data. For instance, if a user views data in Fahrenheit, the app can seamlessly convert the data to Celsius.
A drop-down or toggle in the user interface will allow the user to select their preferred units.
Graphical Representation of Weather Data
Presenting weather data graphically can enhance the user experience. Instead of just displaying numerical values, graphical representations such as charts or graphs can make the data more understandable and visually appealing. For example, a line graph can show the temperature trend over a specific period. Bar graphs could illustrate the comparison of rainfall in different locations. The choice of graphical representation should be based on the type of data being presented.
Location Service Integration
Integrating a location service allows your app to automatically determine the user’s current location. This feature is crucial for providing personalized weather information tailored to the user’s specific location. Geolocation APIs (such as the one provided by Google Maps) can be used to obtain the user’s coordinates. With these coordinates, the app can then fetch and display the relevant weather information.
The user should be provided with an explicit option to allow the app to access their location.
Weather Search History Log
A weather search history log provides a convenient way for users to revisit past searches. Users can access previously searched locations quickly, saving them time and effort. Storing this history locally (in the browser’s local storage or a database) is a suitable approach. This history can be presented as a list or table within the user interface, allowing users to easily access previous searches.
Users should be able to clear their search history if they wish.
Responsive Design and Accessibility
A well-designed weather app should adapt seamlessly to various screen sizes and devices, ensuring a positive user experience for everyone. This involves prioritizing accessibility for users with disabilities and adhering to web standards for a consistent and functional experience across platforms.Responsive design techniques and accessibility features make the app usable on different devices, from desktop computers to smartphones, tablets, and even smartwatches.
This crucial aspect ensures inclusivity and usability for a broader audience.
Responsive Design Techniques
Implementing responsive design is essential for a weather app to adapt to different screen sizes. This involves using CSS media queries to tailor the layout and styling based on the device’s characteristics.
Accessibility Considerations
Designing for accessibility means building the app in a way that people with disabilities can use it effectively. This includes using appropriate color contrast, providing alternative text for images, and ensuring keyboard navigation is possible.
Screen Resolution and Mobile Considerations
Different screen resolutions necessitate careful consideration during design and development.
CSS Media Queries Examples
Media queries allow you to apply different styles based on screen characteristics.
| Media Query | Description |
|---|---|
@media (max-width: 768px) /* Styles for screens up to 768px wide - / |
This query targets screens up to 768 pixels wide. This is often used to adjust the layout for smaller screens. |
@media (min-width: 1024px) /* Styles for screens 1024px and wider - / |
This query targets screens 1024 pixels and wider, ideal for larger displays like desktops. |
Layout and Web Accessibility Guidelines
The app’s layout should conform to web accessibility guidelines, ensuring users with diverse needs can access and interact with the information.
Adherence to accessibility guidelines ensures a user-friendly experience for everyone.
Testing and Debugging
Thorough testing and debugging are crucial for ensuring a weather app functions correctly and reliably. Properly implemented testing procedures help identify and fix potential issues before release, leading to a more robust and user-friendly application. Robust testing methods also help validate the accuracy and reliability of the data fetched from external sources, like weather APIs.
Testing Functionality
A comprehensive approach to testing weather app functionality involves various techniques. Unit tests, focusing on individual components like data fetching or temperature conversion, can isolate potential problems. Integration tests verify the seamless interaction between different modules. End-to-end tests mimic user interactions to ensure the entire flow of the application works as expected. This ensures that all parts of the application, from data retrieval to UI display, function together effectively.
Debugging JavaScript Errors, How to make weather app JavaScript
Troubleshooting JavaScript errors requires a methodical approach. Console logging, strategically placed within the code, can pinpoint the source of issues. Using developer tools, such as the browser’s debugger, allows for step-by-step execution, enabling the identification of problematic lines of code. Understanding error messages and stack traces is essential to pinpoint the exact location of errors. Thorough error handling, including `try…catch` blocks, can prevent unexpected crashes and provide more informative error messages.
Using Browser Developer Tools
Browser developer tools offer powerful tools for debugging. The browser’s JavaScript debugger lets you pause execution, inspect variables, and step through code. The console allows for logging, providing insights into the application’s state. Network tools help monitor API calls and response times. This detailed information helps diagnose and resolve issues efficiently.
A deep understanding of the tools allows developers to understand and fix bugs more quickly.
Testing API Calls and Data Handling
Testing API calls is crucial for ensuring accurate data retrieval. Mocking the API response allows for isolated testing of the application’s data handling without depending on the actual API. This also helps ensure that the app handles various scenarios correctly, such as invalid responses or timeouts. Thorough testing of error handling mechanisms for API responses is equally important, to ensure graceful degradation in case of unexpected issues.
Automated tests for API calls help automate the verification process, ensuring consistent results.
Testing Responsiveness
Ensuring the weather app adapts to various screen sizes and orientations is vital. Responsive testing involves using different browser window sizes, emulating various devices, and examining the layout and functionality under these conditions. Testing on different devices helps to understand how the application behaves across a wide range of screen sizes and orientations. This process identifies and resolves any issues that arise from screen size changes, like overlapping elements or distorted layouts.
Identifying and Fixing UI Glitches
UI glitches can arise from mismatched styles, improper layout calculations, or incorrect positioning. Inspecting the rendered elements and identifying potential conflicts between CSS rules is essential to resolving UI issues. Using browser developer tools to inspect the DOM and stylesheets, and identifying conflicts, can lead to quicker identification of problems. Visual debugging tools and visual testing approaches can help to pinpoint these glitches.
Thorough CSS debugging skills, combined with DOM inspections, are necessary to pinpoint the root causes.
End of Discussion
In summary, this guide has walked you through the essential steps of building a weather application using JavaScript. By following these steps, you’ll have a solid foundation for creating more complex web applications. Remember to adapt these techniques to your specific needs and explore further enhancements to create a truly unique and engaging weather app.


Post Comment