Make Simple To-Do App React
Make simple to-do app React: This comprehensive guide will walk you through building a functional to-do application using React. We’ll cover everything from project setup to deployment, ensuring a robust and user-friendly experience.
From structuring the application’s files to implementing interactive components and data management, we’ll explore various aspects of React development. This detailed approach caters to both beginners and intermediate developers seeking to enhance their React skills.
Project Setup and Structure
A well-structured React application for a to-do app ensures maintainability and scalability. This section Artikels a robust setup approach, detailing necessary files, folders, and data flow, alongside installation instructions. A clear structure prevents future headaches and allows for easy collaboration.
Project Directory Structure
A structured project directory is crucial for managing components, styles, and data effectively. This well-organized layout improves code readability and maintainability.
- The project’s root directory should contain the main application files.
- Components should be grouped into logical folders, promoting reusability and organization.
- Styles, whether CSS or styled-components, should be stored in a dedicated folder for easy management.
- Data, including to-do items, should be stored in a separate file or folder for clear separation of concerns.
File System Structure
The following table demonstrates a typical file system structure for a simple to-do app. This structure allows for modularity and organized development.
| Folder/File | Description |
|---|---|
| src | The main source code directory containing all components, styles, and data. |
| src/components | Holds all reusable UI components (e.g., ToDoItem, AddToDo). |
| src/components/ToDoItem | Component for displaying a single to-do item. |
| src/components/AddToDo | Component for adding new to-do items. |
| src/styles | Contains CSS files or styled-components for styling the application. |
| src/data | Stores data for the to-do list (e.g., an array of to-do items). |
| src/App.js | The main application component, often containing routing and navigation. |
| src/index.js | Entry point for the application, responsible for rendering the app. |
| package.json | Manifest file containing project dependencies and metadata. |
Initial State and Data Flow
The initial state of the application defines the data at the start. Proper management of this state is vital for a functioning to-do app. Data flow refers to how data is passed between components. Effective data flow reduces redundancy and improves code clarity.
- The application’s initial state will hold an empty array of to-do items.
- Data will be stored in a JavaScript object, which is accessible across components.
- Components will update the state through functions like `setState()` or `dispatch()`, depending on the chosen state management library (e.g., Redux).
- Data will be passed to components via props or context for dynamic updates.
Necessary Packages
The following packages are crucial for a functioning React to-do app.
- React and React DOM are fundamental for building the UI.
- ReactDOM is required to render the React application.
- A state management library (e.g., Redux, Zustand) helps maintain application state.
- A styling library (e.g., styled-components, CSS modules) is used to style the application.
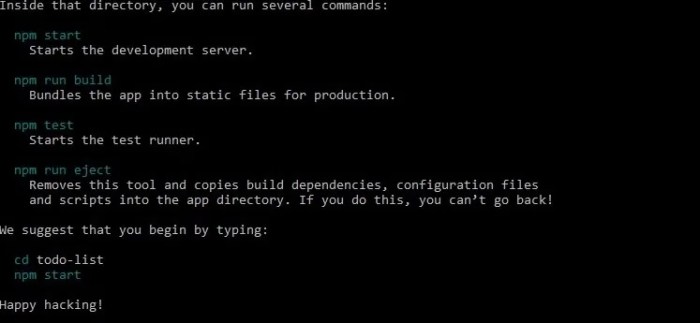
Installation
Install the required packages using npm or yarn:
npm install react react-dom @reduxjs/toolkit styled-components
yarn add react react-dom @reduxjs/toolkit styled-components
User Interface Design
A user-friendly to-do list application requires a clean and intuitive interface. This section Artikels the design choices for a straightforward and efficient to-do list, focusing on input fields, task display, and interactive elements. A well-designed UI will significantly improve user experience and engagement.
Input Fields for Tasks
Creating effective input fields for tasks is crucial. The user should be able to easily enter new tasks and modify existing ones. A simple text input field, ideally with a character limit or validation to prevent excessively long descriptions, allows users to add their tasks concisely. An option for selecting a due date (date/time picker) is beneficial for managing deadlines.
Additionally, incorporating priority levels (e.g., high, medium, low) allows users to categorize tasks based on urgency.
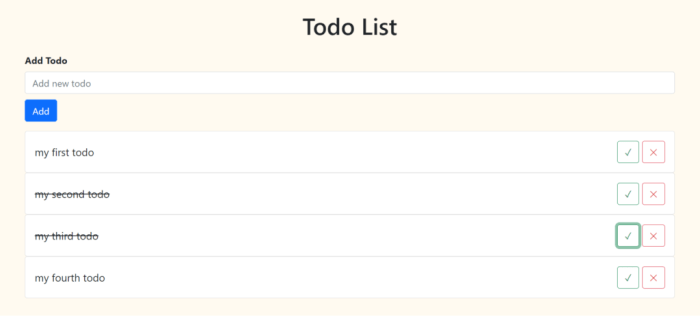
Displaying To-Do List Items
To-do list items should be presented in a clear and organized manner. A list format is highly suitable. Each item should be displayed with the task description, due date, priority level, and a status indicator (e.g., complete/incomplete). Clear visual cues, such as different colors or icons, help differentiate task statuses and priorities. A well-structured list will allow users to quickly scan and identify pending tasks.
Adding, Editing, and Deleting Tasks, Make simple to-do app React
Implementing buttons for adding, editing, and deleting tasks is essential for interactivity. A prominent “Add Task” button facilitates the addition of new tasks. Editing tasks should be easily accessible by enabling a “Edit” button or a similar icon next to each task. Providing a “Delete” button or icon allows users to remove tasks from the list. These actions should be presented with clear visual cues and confirmation prompts to prevent accidental deletions.
Styling the UI
Styling the UI enhances the overall user experience. A consistent color scheme, font, and layout contribute to a visually appealing and coherent interface. Using CSS or a styling library like Material-UI, Bootstrap, or Tailwind CSS, helps achieve a professional and user-friendly design. Consider using responsive design principles to ensure the interface adapts well to different screen sizes and devices.
UI Components and Functionalities
| Component | Functionality |
|---|---|
| Task Input Field | Allows users to enter new task descriptions. |
| Date/Time Picker | Enables users to set deadlines for tasks. |
| Priority Selector | Categorizes tasks by urgency (e.g., high, medium, low). |
| Task Display List | Presents tasks in a structured format, showing details like description, due date, and status. |
| “Add Task” Button | Initiates the process of adding a new task. |
| “Edit” Button | Allows users to modify existing task details. |
| “Delete” Button | Removes tasks from the list. |
| Status Indicator | Visually indicates the completion status of tasks (e.g., checked box). |
Data Handling and Management
Storing and retrieving to-do items effectively is crucial for a functional to-do application. This section details the methods for managing task data locally, including storage mechanisms, state management, and handling updates and deletions. Proper data handling ensures a smooth user experience and maintains the integrity of the application’s data.Effective data management is essential for a robust to-do application.
The choice of storage mechanism and state management approach directly impacts the application’s performance and scalability. Efficient handling of updates and deletions is critical for maintaining data consistency.
Local Storage
Local storage is a simple and readily available method for storing data locally within the user’s browser. It provides a key-value store, allowing for straightforward storage and retrieval of task data. This approach is ideal for small to medium-sized applications with limited data complexity.
Saving and Retrieving Task Data
To save a task, the application needs to convert the task object into a format suitable for local storage. This often involves stringifying the JavaScript object using `JSON.stringify()`. Conversely, retrieving data involves parsing the stored string back into a JavaScript object using `JSON.parse()`. This ensures data consistency and compatibility. For instance, if a task object is stored as ` title: “Grocery Shopping”, description: “Buy milk, eggs, bread” `, this object needs to be converted into a string and then saved to local storage.
Retrieving the task requires parsing the string back into a JavaScript object.
State Management Tools
State management tools like Redux or Context API offer more sophisticated approaches to managing application data, particularly for complex applications. These tools help manage the state of the application in a centralized manner, enabling efficient updates and maintaining application state across different components. For instance, Redux provides a predictable state container for managing application data. This is particularly useful when handling tasks that involve multiple components interacting with the same data.
Task Updates and Deletions
Handling task updates and deletions involves updating the local storage and the application’s state. For example, if a task is marked as complete, the application must update the corresponding task in local storage and reflect this change in the user interface. Similarly, deleting a task necessitates removing it from local storage and the application’s state.
Storage Mechanisms Comparison
Different storage mechanisms have varying characteristics. Local storage is suitable for smaller datasets and straightforward applications. For larger datasets or applications requiring more advanced features, a database like IndexedDB might be a better option. JSON files offer an alternative offline storage mechanism, though they are not as dynamically managed as local storage.
Data Structure Example
“`javascript[ id: 1, title: “Grocery Shopping”, description: “Buy milk, eggs, bread”, completed: false , id: 2, title: “Pay Bills”, description: “Pay electricity and internet bills”, completed: true ]“`
This example demonstrates a simple JSON array of task objects. Each task has an `id`, `title`, `description`, and a `completed` status, which is crucial for managing task completion. Using unique IDs for each task enables efficient updates and deletions without data conflicts.
Functionality Implementation
Source: coderszine.com
Implementing the core functionalities of a to-do app is crucial for its usability. This section details the methods for adding, marking, editing, deleting, sorting, and filtering tasks. These functionalities form the foundation of a practical and user-friendly to-do application.
Adding New Tasks
Adding new tasks involves capturing user input and storing it in a suitable data structure. The input is typically obtained via an input field (e.g., text box) and a button. Upon clicking the button, the task description is extracted from the input field, validated (e.g., ensuring it’s not empty), and added to the application’s data store. A confirmation message or update to the user interface (UI) often signals successful task addition.
Marking Tasks as Complete
Implementing the “complete” functionality involves identifying and updating the status of a task. This is often achieved through a checkbox or a button associated with each task in the UI. When checked, the corresponding task’s status in the data store is updated to reflect its completion. A visual indicator in the UI (e.g., strikethrough text) may also be used to reflect the task’s completion.
Handling Task Editing and Deletion
Editing and deleting tasks are crucial for maintaining data accuracy and user control. Editing entails allowing users to modify existing task descriptions. This is typically accomplished via an in-line editing feature or a dedicated edit form. Deleting tasks removes them from the application’s data store and the UI. User confirmation (e.g., a dialog box) is often a good practice for deletion to prevent accidental data loss.
Handling Task Sorting
Sorting tasks allows users to arrange their to-dos in a manner that best suits their needs. The sorting logic should be customizable to allow users to sort by various criteria, such as task description, due date, or priority. Common sorting algorithms, such as merge sort or quick sort, are efficient for handling large task lists. The sorting functionality updates the display order of tasks in the UI.
Filtering Tasks Based on Criteria
Filtering allows users to focus on specific subsets of tasks based on criteria. This can be implemented using filters based on completion status, due dates, or task priority. A user-friendly UI for applying these filters is important for effective task management. Filtering results in displaying only the relevant tasks to the user.
Functionality Summary Table
| Functionality | Methods/Implementation Details |
|---|---|
| Adding Tasks | Capturing input, validation, data storage, UI update. |
| Marking Tasks as Complete | Identifying task, updating status in data store, visual UI indication. |
| Editing Tasks | Modifying task description, handling updates in data store, updating UI. |
| Deleting Tasks | Removing task from data store, removing task from UI, potential confirmation. |
| Sorting Tasks | Customizable criteria, efficient sorting algorithms (e.g., merge sort), UI update. |
| Filtering Tasks | Applying filters (completion status, due dates, priority), updating UI display. |
Testing and Validation
Thorough testing is crucial for ensuring the reliability and stability of a to-do application. Comprehensive testing strategies identify and resolve potential issues before deployment, ultimately improving user experience and minimizing errors. This section Artikels different testing approaches for the to-do app, focusing on unit and integration testing, and provides practical examples using Jest and React Testing Library.
Testing Approaches
Effective testing involves various approaches. Unit testing isolates individual components, while integration testing verifies interactions between components. These approaches, when combined, ensure the application’s functionality and robustness.
Unit Testing for Components
Unit tests focus on verifying the behavior of individual components in isolation. This approach allows for independent verification of each component’s functionality, making debugging and maintenance easier. A crucial aspect of unit testing is mocking dependencies to avoid external factors impacting the test. This promotes the creation of self-contained and manageable test suites.
- Testing individual component functions (e.g., input validation, task creation) is crucial. This ensures that the component behaves as expected in various scenarios.
- Using a mocking library is essential for isolating component interactions with external systems. This isolates the component’s behavior and focuses on the specific component under test.
- Validating expected output for different inputs, ensuring that the component handles edge cases and conforms to specifications, is essential.
Integration Testing for Interactions
Integration testing assesses the interactions between different components. This verifies how components collaborate and ensures that data flows correctly between them.
- Testing the interaction between the task input component and the task list component for task creation is vital.
- Validating data transfer between components is essential. This ensures that the data is correctly formatted and handled throughout the application.
- Testing how the task list component updates when a task is added, updated, or deleted ensures data consistency.
Testing Scenarios for CRUD Operations
Comprehensive testing covers scenarios for adding, updating, and deleting tasks.
| Scenario | Input | Expected Outcome |
|---|---|---|
| Adding a new task | Valid task description entered in the input field | The task is added to the list, and the list is updated accordingly. |
| Updating an existing task | Valid task description entered in the input field, and the existing task is selected | The selected task’s description is updated, and the list is updated accordingly. |
| Deleting a task | The delete button for the specific task is clicked | The task is removed from the list, and the list is updated accordingly. |
| Adding an empty task | Empty task description entered in the input field | The input is validated as invalid, and no task is added. A relevant error message is displayed to the user. |
Using Testing Libraries
Testing libraries like Jest and React Testing Library are essential for efficient testing.
- Jest provides a robust framework for writing unit and integration tests.
- React Testing Library offers tools for testing React components in a more user-centric way. This ensures that the application’s user interface behaves as expected.
Performance Optimization
Optimizing performance is crucial for a user-friendly to-do application. A sluggish app can deter users and negatively impact their experience. This section explores various techniques to ensure smooth operation, especially when dealing with large amounts of data.
Rendering Optimization for Large To-Do Lists
Efficient rendering is paramount for applications with extensive to-do lists. Strategies such as virtualized lists significantly improve performance by only rendering visible items. This approach minimizes the computational load, leading to a more responsive application. For example, instead of rendering every item in a list of 1000 tasks at once, a virtualized list only renders the tasks currently visible in the viewport.
Handling Potential Performance Bottlenecks
Potential bottlenecks in a to-do application can stem from various sources, including inefficient data fetching, excessive DOM manipulation, or slow computations. Identifying and addressing these bottlenecks is essential for maintaining optimal performance. For instance, optimizing database queries can dramatically reduce the time taken to retrieve data, thus improving the application’s response time.
Performance Optimization Strategies for React Applications
Several strategies contribute to performance enhancement in React applications. Memoization, a technique that caches the results of expensive function calls, can significantly speed up repetitive operations. For instance, if a component frequently recalculates a value based on props, memoization can store the result and reuse it, avoiding redundant computations. Code splitting is another important technique that loads code on demand, reducing initial load times.
By loading only the necessary components and functionalities when they are needed, the overall load time is minimized.
Comparing Approaches to Improving Application Speed
Different approaches to optimizing application speed offer varying degrees of effectiveness. Virtualized lists are highly effective for large datasets, while memoization addresses redundant calculations. Code splitting targets initial load times, improving perceived application responsiveness. Choosing the most appropriate technique depends on the specific performance bottlenecks and application needs.
Performance Optimization Techniques and Impact
| Optimization Technique | Description | Impact |
|---|---|---|
| Virtualized Lists | Only render visible list items. | Significant improvement for large lists, reduces rendering time. |
| Memoization | Cache results of expensive function calls. | Reduces redundant calculations, speeds up component rendering. |
| Code Splitting | Load code on demand. | Reduces initial load time, improves perceived responsiveness. |
| Efficient Data Fetching | Optimize database queries, use appropriate API calls. | Reduces data retrieval time, improves application responsiveness. |
| Minimizing DOM Manipulation | Optimize component updates, use efficient DOM manipulation techniques. | Reduces DOM updates, speeds up application rendering. |
Accessibility Considerations
Ensuring your to-do app is accessible to everyone, regardless of their abilities, is crucial. Accessibility considerations go beyond simply making the app usable; they are vital for inclusivity and represent a strong ethical imperative. By adhering to accessibility best practices, you create a product that is beneficial to a wider audience and enhances the overall user experience.A well-designed accessible to-do app prioritizes usability for users with disabilities, such as visual impairments, auditory impairments, motor impairments, and cognitive differences.
This includes using appropriate color contrast, clear text formatting, and proper keyboard navigation.
ARIA Attributes for Interactive Elements
Implementing ARIA (Accessible Rich Internet Applications) attributes is essential for making interactive elements understandable to assistive technologies like screen readers. This enhances the user experience for individuals who rely on these tools to interact with digital content.
- For buttons, use the
role="button"attribute to ensure screen readers identify them as actionable elements. - For form fields, specify the
aria-labelattribute to provide a descriptive label for each input field, crucial for screen reader users. - Use
aria-describedbyto link form fields to text for enhanced context and understanding. - When using custom interactive components, define their role to ensure screen readers can identify and interpret their functionality.
Keyboard Navigation and Screen Reader Compatibility
Keyboard navigation is vital for users who cannot or choose not to use a mouse. Ensuring the app is navigable using only the keyboard ensures inclusivity and avoids frustrating users. Similarly, screen reader compatibility is paramount. The app should be designed in a way that allows screen readers to accurately interpret and announce all content, including labels, controls, and data.
- Every interactive element should be focusable using the keyboard, allowing users to navigate through the app with ease.
- The app should respond to keyboard events consistently, providing predictable and intuitive behavior.
- Screen readers should be able to interpret all elements and attributes accurately.
- Avoid using JavaScript alone to handle navigation; provide HTML structure for screen reader accessibility.
Color Contrast and Font Size Considerations
Ensuring sufficient color contrast between text and background is critical for users with low vision. Similarly, providing adjustable font sizes caters to various user preferences and visual needs. A wide range of font sizes allows users to customize their experience.
- Adhere to WCAG (Web Content Accessibility Guidelines) recommendations for color contrast ratios, ensuring sufficient differentiation between foreground and background colors.
- Provide users with the ability to adjust font sizes, allowing them to customize the experience based on their needs.
- Use high-contrast color schemes for key elements, such as buttons and error messages, to enhance visibility.
Code Examples for Improved Accessibility
Implementing ARIA attributes and adhering to accessibility guidelines can be demonstrated through code examples. For instance, a button element could be enhanced with the role="button" attribute and an aria-label for improved screen reader compatibility.
<button role="button" aria-label="Add Task">Add Task</button>
This simple example enhances the button’s functionality for assistive technologies. Similar examples can be used for form elements and other interactive components.
Deployment and Hosting
Deploying your React to-do app to a hosting platform is a crucial step in making it accessible to users. Proper hosting ensures the application is available online, allowing users to interact with it. Choosing the right hosting platform is essential, considering factors such as performance, scalability, and cost.
Hosting Platform Options
Various hosting platforms cater to different needs and budgets. Popular choices include Netlify, Vercel, and AWS Amplify. Each platform offers unique features and benefits. Netlify, for example, is known for its ease of use and focus on simplicity for deploying static sites, while Vercel excels in performance and flexibility for more complex applications. AWS Amplify, on the other hand, offers a comprehensive suite of services for building and deploying applications, including serverless functions.
Building and Deploying the Application
The process of building and deploying a React application varies slightly depending on the chosen platform. Generally, the process involves compiling the application’s code into a static format suitable for web hosting. This typically involves running a build command within your project’s directory.
Deployment Methods and Steps
Different platforms have unique workflows. The following table Artikels common deployment methods and their corresponding steps for Netlify, Vercel, and a basic example using a command-line interface.
| Deployment Method | Platform | Steps |
|---|---|---|
| Netlify | Netlify |
|
| Vercel | Vercel |
|
| Command Line (Generic Example) | Any platform |
|
Closing Summary: Make Simple To-do App React
Source: makeuseofimages.com
In conclusion, this project demonstrates a practical application of React principles, focusing on building a functional to-do application. We’ve covered crucial aspects from setup to deployment, highlighting effective strategies for creating efficient and maintainable React applications. By implementing these techniques, you’ll be well-equipped to develop similar applications in the future.


Post Comment