How To Set Up Your First Virtual Machine For Development
How to Set Up Your First Virtual Machine for Development provides a comprehensive guide to creating and configuring your first virtual machine (VM) for development purposes. This detailed walkthrough covers everything from choosing the right virtualization software to installing essential development tools and ensuring optimal performance. Learn how VMs can streamline your workflow and provide a dedicated space for various development environments.
Virtual machines offer a sandboxed environment for development, isolating your projects from the host operating system. This isolation is crucial for preventing conflicts and maintaining a stable development environment. Furthermore, VMs facilitate the portability of your development setup, allowing you to easily replicate your environment on different machines.
Introduction to Virtual Machines
Virtual machines (VMs) are software-based replicas of physical computers. They allow you to run an entire operating system (OS) within another, enabling you to test and develop software in a controlled, isolated environment. This is particularly useful for developers who need to work with specific software versions or operating systems without impacting their primary systems.This isolation, portability, and cost-effectiveness are key advantages of using VMs.
They create a sandboxed environment for software development, reducing the risk of conflicts with other applications or operating systems on your host machine. Furthermore, VMs can be easily moved between different hardware configurations, making it easier to collaborate on projects or deploy software across diverse platforms. This flexibility significantly reduces development costs associated with setting up and maintaining dedicated hardware for each environment.
Virtualization Software Options
Various software platforms facilitate virtualization. These platforms provide the necessary tools to create, manage, and run VMs. Understanding the different options available allows you to choose the best fit for your needs and technical expertise.
Types of Virtualization Software
The most popular virtualization software options include VMware, VirtualBox, and Hyper-V. Each platform offers unique features and capabilities tailored to different needs and use cases.
Comparison of Virtualization Software
| Software | Pros | Cons | Ease of Use | Cost |
|---|---|---|---|---|
| VMware Workstation | Robust features, extensive support, compatibility with various operating systems. Excellent performance and stability. | Can be expensive, learning curve might be steeper for beginners. | Medium to High | High (Commercial) |
| VirtualBox | Open-source, free to use, easy to install and configure. Excellent for basic use cases. | Might not offer the same level of performance as VMware, limited advanced features. | Low to Medium | Low (Open Source) |
| Hyper-V | Integrated into Windows, allowing for seamless integration with other Windows tools. Strong performance on Windows systems. | Limited compatibility with non-Windows systems. Limited support options compared to VMware. | Medium | Included with Windows (part of Windows Server or Windows Pro editions) |
The table above provides a basic comparison of the key features, pros, cons, ease of use, and pricing of the major virtualization software options. Choosing the right software depends on your budget, technical expertise, and specific requirements. For instance, if you’re working on a tight budget and need a simple solution for basic virtualization tasks, VirtualBox is a great option.
If you require a more powerful and comprehensive solution with extensive support, VMware Workstation might be a better choice. Hyper-V, on the other hand, is a cost-effective solution for users who already have a Windows environment.
Choosing the Right Virtualization Software
Selecting the appropriate virtualization software is crucial for a successful development environment. The chosen platform significantly impacts performance, compatibility, and overall efficiency. A poorly chosen solution can lead to bottlenecks and frustration. Carefully evaluating options is key to a smooth development workflow.Choosing the right virtualization software requires a methodical approach. Consider the specific needs of your development project, from the operating systems involved to the anticipated workload.
Factors like performance, ease of use, and community support should also be taken into account. This selection process ensures a tool that meets your project’s unique demands.
Operating System Compatibility
Virtualization software must support the operating systems essential for your development projects. Different platforms offer varying degrees of compatibility. Ensuring the chosen software works seamlessly with your operating systems prevents unexpected issues during development. For example, a software solution lacking support for Linux might prove unsuitable for a project reliant on Linux-based services. Thorough research into supported guest operating systems is necessary.
Performance Requirements
Performance is a critical factor. The software must handle the workload without significant slowdown. Consider the anticipated number of virtual machines, the types of applications running on them, and the processing power required. For resource-intensive applications or projects involving multiple virtual machines, the software’s ability to handle simultaneous tasks and provide sufficient resources is critical. A slow or unresponsive virtual machine environment can drastically hinder productivity.
User Interface and Ease of Use
A user-friendly interface simplifies management and maintenance. A complicated interface can be a significant productivity hurdle. Intuitive navigation and clear documentation are vital. The software should offer a straightforward method for creating, configuring, and managing virtual machines. A developer should be able to quickly learn and utilize the software without extensive training.
Features and Functionalities
Different virtualization software offers a range of features. These features include networking configurations, storage management, and advanced security options. Analyze the specific features needed for your project. For example, a project requiring advanced networking configurations will benefit from software with robust networking options. Evaluate which functionalities align with your development workflow.
Pricing and Licensing
Cost and licensing models are important considerations. Evaluate the software’s pricing structure, whether it’s a one-time purchase or a subscription-based model. Consider the potential long-term costs and ensure the chosen software aligns with your budget. A cost-effective solution is critical to avoid unexpected expenses.
Community Support and Documentation
A robust community and extensive documentation are valuable assets. This ensures support is readily available if issues arise. Active forums and clear documentation make troubleshooting easier. Consider the availability of support channels, such as online forums or dedicated customer support teams. This aspect is crucial for long-term maintenance and assistance.
Criteria for Choosing the Right Software
- Compatibility: Ensure the software supports all required operating systems.
- Performance: Evaluate the software’s ability to handle anticipated workloads and virtual machine counts.
- User Interface: Prioritize a user-friendly interface for efficient management.
- Features: Assess the functionalities needed for the project, such as networking, storage, and security options.
- Pricing: Analyze the cost and licensing model to ensure budget alignment.
- Support: Consider the availability of community support and documentation.
Setting up the Virtual Machine
Creating a virtual machine (VM) is a crucial step in setting up your development environment. This involves configuring the virtual hardware, installing an operating system, and ensuring appropriate resource allocation. A well-configured VM provides a dedicated space for development, allowing you to experiment and test code without impacting your host system.Setting up a VM involves several key steps, beginning with defining the virtual hardware and extending to installing the operating system.
Careful consideration of resources like CPU, RAM, and storage is paramount for optimal performance. This process ensures that your virtual machine functions smoothly and effectively supports your development tasks.
Creating a New Virtual Machine
The process of creating a new virtual machine typically begins within the chosen virtualization software. Specific steps vary depending on the chosen software. However, common elements include specifying the VM’s name, selecting the operating system type, and configuring its resources.
Configuring VM Resources
Proper resource allocation is critical for a productive development environment. The virtual machine’s resources directly impact its performance. Choosing the right amount of CPU cores, RAM, and storage space is essential.
- CPU Cores: The number of virtual CPU cores allocated to the VM affects its processing power. For basic development tasks, a single core might suffice. More demanding applications, such as those involving complex calculations or simulations, may require more cores. A general guideline is to allocate at least one core per processor thread. Consider allocating more cores if you anticipate heavy multitasking within the virtual machine.
For instance, running multiple development tools concurrently might require more cores.
- RAM: RAM (Random Access Memory) is crucial for the VM’s performance. Sufficient RAM allows the operating system and applications to run smoothly. Insufficient RAM can lead to slow performance, frequent page swapping, and potential crashes. An appropriate amount of RAM depends on the applications you intend to run. For example, running a complex web application might require more RAM than a simple text editor.
- Storage: The storage capacity allocated to the virtual machine determines the amount of data it can store. Ensure you allocate sufficient storage space for the operating system, applications, and project files. Consider using a fast storage device for the virtual disk to improve performance. If your projects are expected to grow significantly, allocate enough space to accommodate expansion.
Installing the Operating System
After configuring the VM’s resources, the next step is installing the desired operating system. This process is similar to installing an OS on a physical machine. A common approach involves using an ISO image of the desired OS.
- Prepare the ISO Image: Locate the ISO image file of the desired operating system. The ISO image contains the necessary files to install the OS.
- Start the VM: Initiate the VM’s operation. You should be presented with the operating system installation options.
- Follow the Instructions: The installation process is guided by the OS installation wizard. Follow the on-screen instructions to complete the installation process. This involves partitioning the virtual disk, setting up the time zone, and choosing the necessary configuration options.
Allocating Appropriate Resources
Allocating appropriate resources is critical for optimal VM performance. The allocated resources should align with the expected workload of the VM. Over-allocation can lead to wasted resources, while under-allocation can lead to performance bottlenecks.
Careful consideration of CPU, RAM, and storage requirements ensures a well-performing virtual machine.
Configuring the Virtual Machine
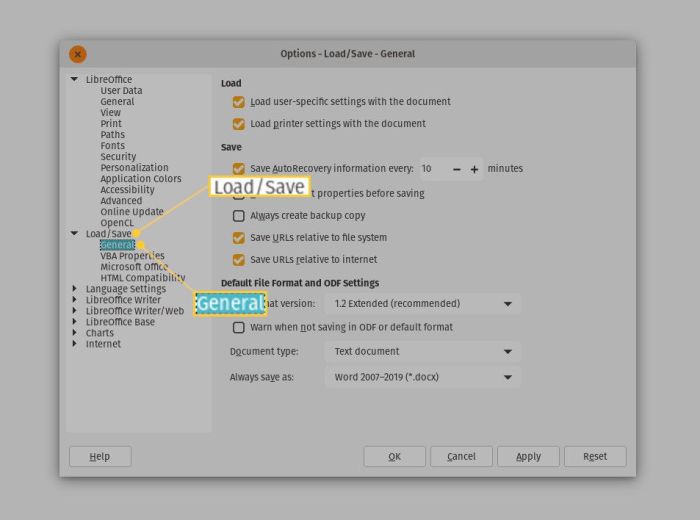
Proper configuration of your virtual machine’s network settings is crucial for seamless interaction with your host operating system and other virtual machines. This involves setting up the network adapter and potentially sharing files between the virtual and host machines. This section provides a step-by-step guide to configure the virtual machine’s network adapter and file sharing.
Network Settings Configuration
Effective network configuration within a virtual machine is paramount for development tasks. Without proper networking, accessing resources and collaborating with others becomes significantly more complex and time-consuming. Correct configuration enables seamless communication between the virtual machine and the host system, as well as external networks.
- Configuring the Network Adapter: The virtual network adapter acts as the bridge between your virtual machine and the network. Selecting the appropriate network adapter type is essential. A bridged network adapter connects the virtual machine to the host’s network, allowing the virtual machine to access the internet and local network resources directly. A NAT (Network Address Translation) adapter translates the virtual machine’s IP address to the host’s network address, providing a more secure connection.
A host-only adapter creates a private network solely for the virtual machine, preventing it from directly accessing the host’s network or the internet.
- Choosing the Right Network Adapter Type: The choice depends on the intended use case. A bridged network is suitable for development environments that require full network access. A NAT adapter is often preferred for testing purposes where direct internet access isn’t required, but access to the host’s network is necessary. Host-only networks are ideal for isolated development environments where the virtual machine should not interact with the host’s network or the internet.
File Sharing Configuration
Sharing files between the virtual machine and the host system is a common requirement for development. This often involves transferring project files, configurations, or other data between the systems.
- Enabling File Sharing: Virtualization software typically provides options to map network drives or use shared folders to facilitate file sharing. The exact steps vary depending on the chosen virtualization software. Carefully review the software’s documentation for detailed instructions on setting up shared folders or mapped drives. The process often involves creating a shared folder on the host system and then mounting it within the virtual machine.
Networking Configurations and Use Cases
The table below Artikels different networking configurations and their corresponding use cases:
| Network Configuration | Description | Use Cases |
|---|---|---|
| Bridged | Connects the virtual machine to the host’s network, providing direct access to the internet and local network resources. | Development environments requiring full network access, testing web applications, connecting to databases on the local network. |
| NAT | Translates the virtual machine’s IP address to the host’s network address, providing a secure connection. | Testing applications with internet access but without direct exposure to the host’s network, development environments requiring limited access to external networks. |
| Host-only | Creates a private network solely for the virtual machine, preventing it from directly accessing the host’s network or the internet. | Isolated development environments, testing applications that should not interact with the host’s network or the internet, creating secure environments for development. |
Installing Development Tools and Software: How To Set Up Your First Virtual Machine For Development
Setting up a development environment within a virtual machine requires careful consideration of the tools and software needed. The right choices significantly impact efficiency and the quality of the development process. This section details the process of installing essential tools, highlighting the importance of selecting appropriate software and providing a step-by-step guide for installing a complete development environment.Choosing the correct tools and software is crucial for a productive development environment.
The specific requirements depend heavily on the type of development being undertaken. For example, a web developer needs different tools than a mobile app developer. Understanding these needs allows for a tailored installation process.
Installing a Programming Language
The selection of a programming language is often the first step in installing a development environment. This choice dictates the specific tools required for compilation, execution, and debugging. For instance, Python often utilizes a package manager like pip for installing libraries.
- Download the appropriate installer: Download the language’s installer from the official website. Verify the download is from a trusted source to prevent malware. Different languages may offer various installers, such as executables, source code, or packages.
- Run the installer: Follow the instructions provided by the installer. This typically involves accepting license agreements and selecting installation options. For instance, Python installers might allow you to specify the installation directory.
- Verify installation: Once the installation is complete, verify the installation by executing a simple program or script in a terminal or command prompt. This confirms that the language’s interpreter or compiler is properly configured.
Installing an Integrated Development Environment (IDE)
An IDE provides a comprehensive environment for software development. It often includes features like code editing, debugging tools, and project management. Choosing the right IDE is crucial for developer efficiency.
- Select an IDE: Select an IDE appropriate for the programming language you installed. Different programming languages often have specific IDEs that provide optimal support and features for that language. For example, Visual Studio Code is popular for a wide range of languages.
- Download the IDE installer: Download the IDE installer from the official website, ensuring you download the correct version for your operating system.
- Run the installer: Follow the instructions provided by the installer, selecting appropriate installation options. This may involve choosing installation location and optional components.
- Verify installation: Open the IDE to verify that it’s working correctly. Check that the IDE can recognize your programming language, and confirm it can execute basic tasks.
Installing Essential Development Tools
Various tools are essential for software development, including version control systems (e.g., Git), testing frameworks, and debuggers. Selecting the appropriate tools improves development efficiency and facilitates collaborative work.
- Choose the appropriate version control system: Select the version control system that aligns with your team’s or project’s needs. Popular choices include Git, which offers a distributed version control system.
- Download and install the version control system: Download the appropriate version control system installer from the official website. The installation procedure generally involves following the on-screen instructions.
- Configure the version control system: Configure the version control system, including setting up repositories and user accounts. This process may require creating an account or setting up credentials.
Step-by-Step Guide for Installing a Full Development Environment
This guide provides a structured approach to setting up a comprehensive development environment.
- Choose your programming language and IDE: Select a programming language and a compatible IDE that aligns with your project’s requirements.
- Install the programming language: Download and install the language’s interpreter or compiler, following the installer’s instructions.
- Install the IDE: Download and install the chosen IDE for the programming language.
- Install a version control system (e.g., Git): Download and install a version control system, such as Git, following the installer’s instructions.
- Verify installations: Verify that all tools are functioning correctly by running sample programs or scripts. Confirm that the IDE can recognize the language and the version control system is configured properly.
Testing and Troubleshooting
Source: lippke.li
Ensuring your virtual machine (VM) functions smoothly and reliably is crucial for a productive development environment. Thorough testing and troubleshooting procedures are vital to identify and resolve potential issues before they impact your workflow. This section details the necessary steps to verify functionality, address common problems, and maintain optimal performance.
Testing Virtual Machine Functionality
Proper testing of a VM’s functionality involves verifying its core components and applications run as expected. This ensures that the virtualized environment behaves similarly to a physical machine for the specific tasks you need. Begin by running standard operating system (OS) tests, checking basic functions like file system access, network connectivity, and application launch. These steps are crucial to verify the virtual environment’s stability.
- Verify network connectivity: Ensure that the VM can communicate with the host machine and other networks. Check network configuration settings within the VM and verify internet access. Use tools like ping to validate connectivity to external resources.
- Test applications: Run the applications you intend to use within the VM. Evaluate their performance and stability to ensure compatibility with the virtual environment. Check for any unusual behavior or crashes.
- Run system utilities: Utilize system utilities to check the CPU, memory, and storage usage of the VM. This step is important to understand how the virtual machine utilizes resources and spot potential bottlenecks.
Troubleshooting Connection Problems
Connection issues are common in virtual environments. Troubleshooting these issues often involves examining the network configuration on both the host and guest operating systems.
- Verify network settings: Double-check the network settings of both the host machine and the VM. Ensure the correct IP addresses, subnet masks, and gateways are configured. Confirm that the VM’s network adapter is properly connected.
- Examine firewall rules: Verify that firewalls on both the host and guest operating systems aren’t blocking communication between them. Adjust firewall rules if necessary to allow the required traffic.
- Check network cables and connections: If using physical connections, verify that all cables are properly connected and working. Ensure network ports are active and functioning correctly on the host machine.
Addressing Performance Bottlenecks
Performance bottlenecks in a VM can stem from various causes, including insufficient resources allocated to the VM or inefficient software configurations. Analyzing and addressing these bottlenecks is crucial for smooth operation.
- Monitor resource utilization: Track the CPU, memory, and storage usage of the VM. Identify periods of high resource consumption and investigate potential causes.
- Adjust resource allocation: If necessary, increase the allocated resources to the VM in the virtual machine settings. Consider the RAM, CPU cores, and storage space requirements for your applications and adjust accordingly.
- Optimize application settings: Review application settings within the VM to improve performance. This could involve adjusting caching mechanisms, optimizing database queries, or adjusting other performance-related parameters.
Resolving Software Conflicts, How to Set Up Your First Virtual Machine for Development
Software conflicts can arise from incompatibility issues between the guest OS and installed applications. Identifying and resolving these issues can be challenging but essential.
- Check for software compatibility: Verify that the installed software is compatible with the guest operating system. Look for specific requirements for the OS version, libraries, or other dependencies.
- Update software: Update both the guest OS and any applications to the latest versions to resolve known compatibility issues. Keep software up-to-date to fix bugs and ensure compatibility.
- Examine log files: Review system logs to identify errors or warnings that might indicate a software conflict. This can reveal clues to understanding the nature of the conflict.
Monitoring Virtual Machine Performance
Regular performance monitoring is essential for proactively addressing potential issues and maintaining a stable environment. Tools can provide detailed insight into the VM’s resource consumption and stability.
- Utilize monitoring tools: Employ performance monitoring tools to track CPU, memory, disk I/O, and network traffic. These tools provide real-time information on the VM’s resource utilization.
- Set up alerts: Configure alerts for critical performance thresholds. This proactive approach allows you to quickly address potential problems before they escalate.
- Analyze performance data: Regularly review performance data to identify patterns and trends. Identify any consistent bottlenecks or anomalies in the virtual machine’s performance.
Security Considerations
Securing your virtual machine (VM) is paramount, regardless of its intended use. A compromised VM can expose sensitive data, disrupt operations, and potentially impact the entire network. This section Artikels crucial security measures to fortify your virtualized development environment.A robust security posture for your VM starts with a proactive approach. Implementing strong security practices during setup and throughout the VM’s lifecycle will minimize vulnerabilities and protect your data.
Essential Security Measures
Implementing robust security measures is crucial for preventing unauthorized access and data breaches. These measures should be integral to the VM setup process, not an afterthought.
- Strong Passwords and Authentication: Employ strong, unique passwords for all VM accounts. Avoid using easily guessed passwords. Utilize multi-factor authentication (MFA) wherever possible to add an extra layer of security. This prevents unauthorized login attempts and protects against password cracking. Implement a password policy that mandates complexity and regular changes.
- Network Security Configuration: Carefully configure the network settings of your VM. Restrict access to the VM from external networks. Utilize firewalls to control inbound and outbound traffic. Establish a secure network configuration that limits access to only necessary ports and protocols. Configure your VM to communicate only with trusted networks.
- Regular Security Audits and Updates: Regularly update the operating system and virtualization software on your VM. Patching vulnerabilities is critical to maintain the integrity of the system. Conduct security audits to identify potential weaknesses and address them promptly. Schedule regular checks to ensure the software and operating system are up-to-date, and that security patches are applied immediately.
- Data Encryption: Encrypt sensitive data stored on the VM and the host machine. Use strong encryption algorithms and keep the encryption keys secure. Data encryption protects sensitive information from unauthorized access, even if the VM is compromised. Encrypt both data at rest and in transit.
- Access Control: Implement strict access controls to limit the permissions of users accessing the VM. Only grant necessary permissions to individuals who need them. Limit access to specific files and directories based on user roles and responsibilities. Enforce a least privilege model to prevent unauthorized actions.
VM Firewall Configuration
A robust firewall is an essential component of VM security. Proper configuration prevents unauthorized access from the outside world.
- Firewall Rules: Establish strict firewall rules to control network traffic. Allow only essential ports and protocols for communication. Block all other traffic. Regularly review and update firewall rules to adapt to changing security needs. Create rules to permit only necessary traffic to and from the VM.
- Port Forwarding: Carefully configure port forwarding rules. Only expose necessary ports to the outside world. Restrict access to specific applications running on the VM. Use port forwarding only for applications that need to communicate with external systems.
Best Practices for VM Security
Adhering to best practices helps to maintain a secure VM environment. These practices reduce the risk of compromise and enhance the overall security posture.
- Regular Backups: Regularly back up the VM to protect against data loss due to hardware failure, software corruption, or malicious activity. Implement a robust backup strategy that includes both full and incremental backups. Create backups of critical data and applications to ensure data recovery capabilities.
- Strong Virtualization Software: Select and use reputable virtualization software that incorporates strong security features. Choose a vendor with a strong track record of security updates and support. Investigate the security features of the chosen virtualization software and its security updates.
- Security Awareness Training: Provide security awareness training to users who interact with the VM to educate them about potential threats and vulnerabilities. Emphasize the importance of strong passwords, safe browsing practices, and recognizing phishing attempts. Promote a culture of security awareness within the team to minimize human errors.
Best Practices for Development
Virtual machines (VMs) offer a powerful way to manage diverse development environments, isolate projects, and streamline workflows. Implementing best practices for VM utilization maximizes efficiency and minimizes potential issues. This section details key strategies for leveraging VMs effectively in your development process.Employing VMs effectively for development is crucial. By isolating environments, developers can maintain consistent configurations, reducing the risk of conflicts between projects and ensuring a stable development process.
Furthermore, the ability to easily create and destroy VMs allows for rapid experimentation and iteration.
Optimizing VM Performance
Proper configuration and management are essential for maximizing VM performance. Performance optimization involves several key aspects.
- Resource Allocation: Allocating appropriate CPU cores, RAM, and storage capacity is vital. Over-allocation can lead to performance bottlenecks, while under-allocation may result in slowdowns. A properly sized VM is crucial for optimal performance.
- Disk I/O Optimization: Efficient disk I/O is paramount for responsiveness. Consider using solid-state drives (SSDs) for the VM’s virtual hard drive (VHD). SSDs provide faster read and write speeds compared to traditional hard disk drives (HDDs), significantly improving performance, especially during development tasks like compilation or running large applications.
- Network Configuration: Network configuration plays a critical role in the speed and reliability of VM operations. A fast and stable network connection is essential for downloading dependencies, uploading code, and transferring data between the host and the VM. Choosing the correct network adapter type and settings is key to achieving optimal network performance within the virtual environment.
Managing Different Development Environments
Virtual machines provide an ideal platform for maintaining isolated and consistent development environments. This allows for easy switching between different versions of software, libraries, and operating systems without impacting other projects.
- Environment Isolation: Each project can run in its own VM, isolating dependencies and preventing conflicts between different development projects. This isolates issues and simplifies troubleshooting.
- Version Control: Using VMs for different project versions enables consistent deployments and streamlined testing. Each VM can represent a specific environment or deployment stage, making it straightforward to test and deploy to various production environments. Version control, coupled with VM snapshots, is an efficient way to manage different versions and environments.
Maintaining a Virtual Machine Environment
Regular maintenance ensures the stability and efficiency of your virtual machine infrastructure. This includes proactive steps to prevent issues.
- Regular Backups: Regular backups are crucial to safeguard against data loss due to hardware failures or software glitches. Creating frequent snapshots of the VM allows for quick recovery in case of unexpected issues.
- Security Updates: Keeping the host operating system and virtualization software up-to-date is vital for security. Applying security patches and updates protects against potential vulnerabilities and ensures the stability of the virtual environment.
- Performance Monitoring: Monitoring the performance of the VM, including CPU usage, memory consumption, and disk I/O, is essential for identifying potential bottlenecks and ensuring optimal performance. Tools for monitoring VM performance can pinpoint areas requiring adjustments to maintain smooth operations.
Last Point
In summary, setting up your first virtual machine for development is a valuable investment in your workflow. This guide has provided a step-by-step approach to creating a robust and efficient development environment. From selecting the right virtualization software to securing your VM, this comprehensive approach empowers you to build and maintain a tailored development space that aligns with your specific needs.


Post Comment